
In our partnership with Red Hat, we continue to focus on supporting enterprise users who require a high‑performance, scalable, long‑term solution for DevOps‑compatible service delivery in OpenShift. The NGINX Ingress Operator for OpenShift is a supported and certified mechanism for deploying NGINX Plus Ingress Controller for Kubernetes alongside the default router in an OpenShift environment, with point-and-click installation and automatic upgrades. You can leverage the Operator Lifecycle Manager (OLM) to perform installation, upgrade, and configuration of the NGINX Ingress Operator.
Wondering why you would want to use the NGINX Plus Ingress Controller in addition to the default router? Learn how our partnership enables secure, scalable, and supported application delivery in our The Value of Red Hat + NGINX blog.
This step-by-step guide provides everything you need to get started with the NGINX Ingress Operator. Before getting started, make sure you have admin access to an OpenShift cluster environment running OpenShift 4.3 or later.
Installing the Operator
Here’s a video showing how to install the NGINX Ingress Operator, followed by a written summary with screenshots.
We install the NGINX Ingress Operator from the OpenShift console.
- Log into the OpenShift console as an administrator.
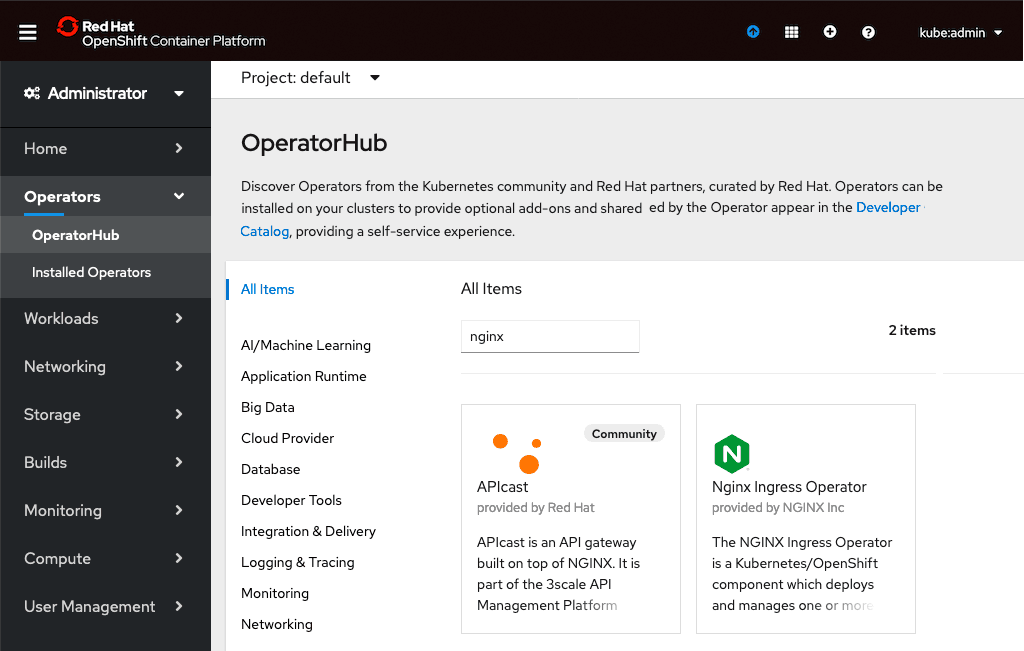
- In the left navigation column, click Operators and then OperatorHub. Type nginx in the search box, and click on the Nginx Ingress Operator box that appears.
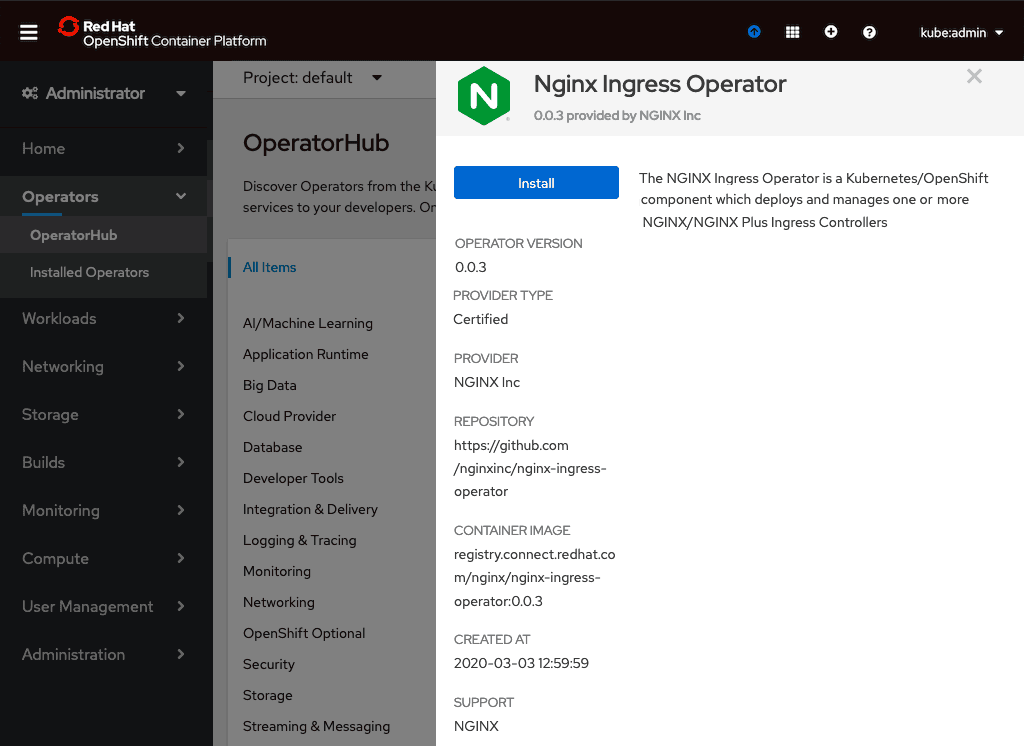
- After reviewing the product information, click the Install button.
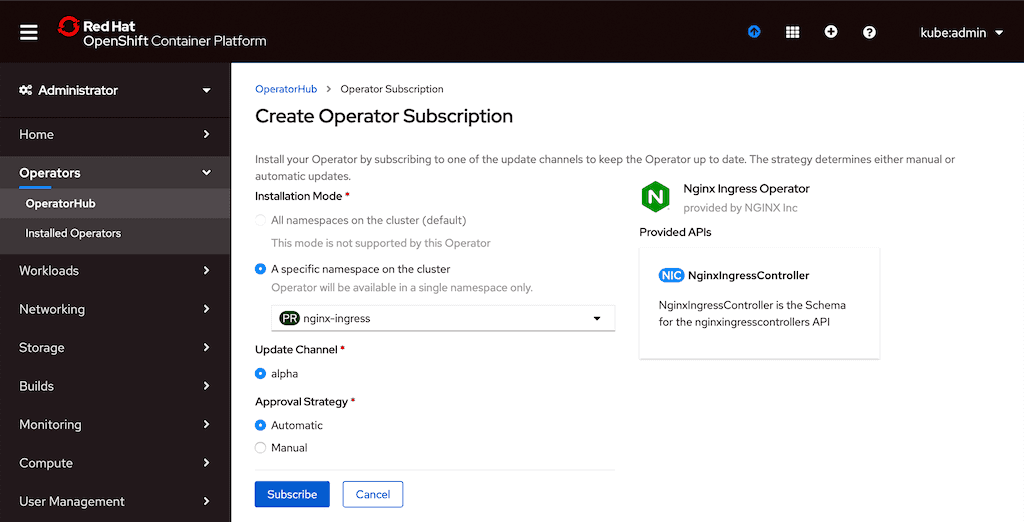
- On the Create Operator Subscription page that opens, specify the cluster namespace in which to install the operator (in this example it’s nginx-ingress). Also click the Automatic radio button under Approval Strategy, to enable automatic updates of the running Operator instance without manual approval from the administrator. Click the Subscribe button.
- After the installation completes, run this command in a terminal to verify that the Operator is running:
# oc get pods –n nginx-ingressNAME                                     READY   STATUS    RESTARTS   AGE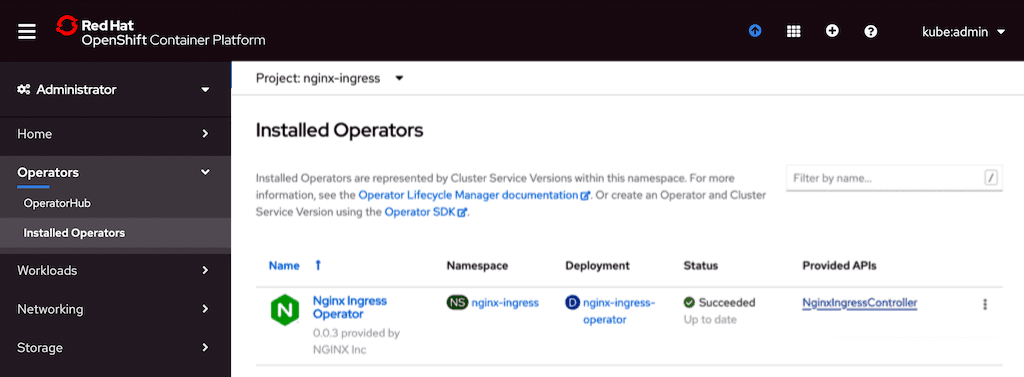
nginx-ingress-operator-dd546d869-xxxxx 1/1 Running 0 7m29s- Click Installed Operators in the left navigation column. On the page that opens, click the NginxIngressController link in the Provided APIs column. NginxIngressController is a custom resource which the Operator uses to deploy the NGINX Plus Ingress Controller on the OpenShift cluster.
- On the page that opens, paste a manifest like the following example into the text field, and click the Create button to deploy the NGINX Plus Ingress Controller for Kubernetes deployment.Note that we are embedding a Secret with a TLS certificate and key in the
defaultSecretandwildcardTLSfields. This enables TLS termination and passthrough without requiring the Secret to be included in the Ingress policies.There are numerous options you can set when configuring the NGINX Plus Ingress Controller for Kubernetes, as listed at our GitHub repo.
apiVersion: k8s.nginx.org/v1alpha1kind: NginxIngressController
metadata:
  name: my-nginx-ingress-controller
  namespace: nginx-ingress
spec:
  enableCRDs: true
  image:
    pullPolicy: Always
    repository: registry.hub.docker.com/nginx/nginx-ingress
    tag: edge
  nginxPlus: false
  serviceType: LoadBalancer
  type: deployment
  replicas: 2
  defaultSecret: nginx-ingress/default-server-secret
  wildcardTLS: default/app-secret
  configMapData:
    error-log-level: debug
  enableTLSPassthrough: true
globalConfiguration: nginx-ingress/nginx-configuration- To verify the deployment, run the following commands in a terminal. As shown in the output, the manifest we used in the previous step deployed two replicas of the NGINX Plus Ingress Controller and exposed them with a
LoadBalancerservice. (The output from thegetcommand is spread across multiple lines for legibility.)
# oc get pods -n nginx-ingressNAME                                          READY  STATUS   RESTARTS  AGE
my-nginx-ingress-controller-579f455d7d-xxxxx  1/1    Running  0         5m53s
my-nginx-ingress-controller-579f455d7d-xxxxx  1/1    Running  0         5m53s
nginx-ingress-operator-dd546d869-xxxxx        1/1    Running  0         56m

# oc get svc –n nginx-ingress
my-nginx-ingress-controller      LoadBalancer   172.xx.48.254    <pending>  ...
nginx-ingress-operator-metrics   ClusterIP      172.xx.209.190   <none>     ...

    ... 80:32028/TCP,443:31973/TCP   10m
... 80:32028/TCP,443:31973/TCP 10m- Run the following command to verify that the NGINX Plus Ingress Controller responds to requests. For
public_IP_addresssubstitute the external IP address of theLoadBalancerservice exposing the NGINX Plus Ingress Controller.Notice that at this point the command returns404NotFound. That’s because we haven’t yet configured and deployed an Ingress resource to route traffic to the backend Pods. For more information, see our documentation.
# curl public_IP_address <html>
<head><title>404 Not Found</title></head>
<body bgcolor="white">
<center><h1>404 Not Found</h1></center>
<hr><center>nginx/1.13.4</center>
</body>
</html>- Note that end users can submit multiple manifests of the NginxIngressController resource and a separate deployment is created for each one. The Operator also supports deployments across different namespaces. The namespace can be specified in the
metadatasection of the manifest.
What’s Next?
The NGINX Ingress Operator helps you manage your NGINX Plus Ingress Controller deployment, in particular with:
- Configuration – Launch a basic deployment with just a few input parameters and one manifest
- Scaling – Add and remove replicas seamlessly
- Upgrading – Leverage rolling updates with no downtime
- Uninstalling – Ensure that all Operator and Kubernetes Ingress Controller objects are properly and safely removed
Now that you have the NGINX Plus Ingress Controller ready and deployed, see our documentation and GitHub repo to use the advanced capabilities of NGINX Plus in OpenShift.
Not a customer already? To try NGINX Plus and the Ingress Controller, start your free 30-day trial today or contact us to discuss your use cases.
The Value of Red Hat + NGINX

About the Author

Related Blog Posts

Automating Certificate Management in a Kubernetes Environment
Simplify cert management by providing unique, automatically renewed and updated certificates to your endpoints.

Secure Your API Gateway with NGINX App Protect WAF
As monoliths move to microservices, applications are developed faster than ever. Speed is necessary to stay competitive and APIs sit at the front of these rapid modernization efforts. But the popularity of APIs for application modernization has significant implications for app security.
How Do I Choose? API Gateway vs. Ingress Controller vs. Service Mesh
When you need an API gateway in Kubernetes, how do you choose among API gateway vs. Ingress controller vs. service mesh? We guide you through the decision, with sample scenarios for north-south and east-west API traffic, plus use cases where an API gateway is the right tool.
Deploying NGINX as an API Gateway, Part 2: Protecting Backend Services
In the second post in our API gateway series, Liam shows you how to batten down the hatches on your API services. You can use rate limiting, access restrictions, request size limits, and request body validation to frustrate illegitimate or overly burdensome requests.
New Joomla Exploit CVE-2015-8562
Read about the new zero day exploit in Joomla and see the NGINX configuration for how to apply a fix in NGINX or NGINX Plus.
Why Do I See “Welcome to nginx!” on My Favorite Website?
The ‘Welcome to NGINX!’ page is presented when NGINX web server software is installed on a computer but has not finished configuring