This post is one of four tutorials that help you put into practice concepts from Microservices March 2023: Start Delivering Microservices:
- How to Deploy and Configure Microservices (this post)
- How to Securely Manage Secrets in Containers
- How to Use GitHub Actions to Automate Microservices Canary Releases
- How to Use OpenTelemetry Tracing to Understand Your Microservices
All apps require configuration, but the considerations when configuring a microservice may not be the same as for a monolithic app. We can look to Factor 3 (Store config in the environment) of the twelve‑factor app for guidance applicable to both types of apps, but that guidance can be adapted for microservices apps. In particular, we can adapt the way we define the service configuration, provide the configuration to a service, and make a service available as a configuration value for other services that may depend on it.
For a conceptual understanding of how to adapt Factor 3 for microservices – specifically the best practices for configuration files, databases, and service discovery – read Best Practices for Configuring Microservices Apps on our blog. This post is a great way to put that knowledge into practice.
Note: Our intention in this tutorial is to illustrate some core concepts, not to show the right way to deploy microservices in production. While it uses a real “microservices” architecture, there are some important caveats:
- The tutorial does not use a container orchestration framework such as Kubernetes or Nomad. This is so that you can learn about microservices concepts without getting bogged down in the specifics of a certain framework. The patterns introduced here are portable to a system running one of these frameworks.
- The services are optimized for ease of understanding rather than software engineering rigor. The point is to look at a service’s role in the system and its patterns of communication, not the specifics of the code. For more information, see the README files of the individual services.
Tutorial Overview
This tutorial illustrates how Factor 3 concepts apply to microservices apps. In four challenges, you’ll explore some common microservices configuration patterns and deploy and configure a service using those patterns:
- In Challenge 1 and Challenge 2 you explore the first pattern, which concerns where you locate the configuration for a microservices app. There are three typical locations:
- The application code
- The deployment script for the application
- Outside sources accessed by the deployment script
- In Challenge 3 you set up two more patterns: exposing the app to the outside world via a NGINX as a reverse proxy and enabling service discovery using Consul.
- In Challenge 4 you implement the final pattern: using an instance of your microservice as a “job runner” that performs a one-off action different from its usual function (in this case emulating a database migration).
The tutorial uses four technologies:
- messenger – A simple chat API with message storage capabilities, created for this tutorial
- NGINX Open Source – An entry point to the messenger service and the wider system at large
- Consul – A dynamic service registry and key‑value store
- RabbitMQ – A popular open source message broker that enables services to communicate asynchronously
Watch this video to get an overview of the tutorial. The steps do not exactly match this post, but it helps in understanding the concepts.
 
Prerequisites and Set Up
Prerequisites
To complete the tutorial in your own environment, you need:
- A Linux/Unix‑compatible environment
- Basic familiarity with the Linux command line, JavaScript, and
bash(but all code and commands are provided and explained, so you can still succeed with limited knowledge) - Docker and Docker Compose
- Node.js 19.x or later
curl(already installed on most systems)- The four technologies listed in Tutorial Overview: messenger (you’ll download it in the next section), NGINX Open Source, Consul, and RabbitMQ.
Set Up
- Start a terminal session (subsequent instructions will refer to this as the app terminal).
- In your home directory, create the microservices-march directory and clone the GitHub repositories for this tutorial into it. (You can also use a different directory name and adapt the instructions accordingly.) Note: Throughout the tutorial the prompt on the Linux command line is omitted, to make it easier to copy and paste the commands into your terminal. The tilde (
~) represents your home directory.
mkdir ~/microservices-marchcd ~/microservices-march git clone https://github.com/microservices-march/platform.git --branch mm23-twelve-factor-start git clone https://github.com/microservices-march/messenger.git --branch mm23-twelve-factor-start- Change to the platform repository and start Docker Compose:
cd platformdocker compose up -d --build- This starts both RabbitMQ and Consul, which will be used in subsequent challenges.
- The
-dflag instructs Docker Compose to detach from the containers when they have started (otherwise the containers will remain attached to your terminal). - The
--buildflag instructs Docker Compose to rebuild all images on launch. This ensures that the images you are running stay updated through any potential changes to files.
- The
- Change to the messenger repository and start Docker Compose:
cd ../messengerdocker compose up -d --build- This starts the PostgreSQL database for the messenger service, which we’ll refer to as the messenger-database for the remainder of the tutorial.
Challenge 1: Define Application-Level Microservices Configuration
In this challenge you set up configuration in the first of the three locations we’ll look at in the tutorial: the application level. (Challenge 2 illustrates the second and third locations, deployment scripts and outside sources.)
The twelve‑factor app specifically excludes application‑level configuration, because such configuration doesn’t need to change between different deployment environments (which the twelve‑factor app calls deploys). Nonetheless, we cover all three types for completeness – the way you deal with each category as you develop, build, and deploy a service is different.
The messenger service is written in Node.js, with the entrypoint in app/index.mjs in the messenger repo. This line of the file:
app.use(express.json());is an example of application‑level configuration. It configures the Express framework to deserialize request bodies that are of type application/json into JavaScript objects.
This logic is tightly coupled to your application code and isn’t what the twelve‑factor app considers “configuration”. However, in software everything depends on your situation, doesn’t it?
In the next two sections, you modify this line to implement two examples of application‑level configuration.
Example 1
In this example, you set the maximum size of a request body accepted by the messenger service. This size limit is set by the limit argument to the express.json function, as discussed in the Express API documentation. Here you add the limit argument to the configuration of the Express framework’s JSON middleware discussed above.
- In your preferred text editor, open app/index.mjs and replace:
app.use(express.json())- with:
app.use(express.json({ limit: "20b" }));- In the app terminal (the one you used in Set Up), change to the app directory and start the messenger service:
cd app npm install node index.mjs
messenger_service listening on port 4000- Start a second, separate terminal session (which subsequent instructions call the client terminal) and send a
POSTrequest to the messenger service. The error message indicates that the request was successfully processed, because the request body was under the 20-byte limit set in Step 1, but that the content of the JSON payload is incorrect:
curl -d '{ "text": "hello" }' -H "Content-Type: application/json" -X POST http://localhost:4000/conversations...
{ "error": "Conversation must have 2 unique users" }- Send a slightly longer message body (again in the client terminal). There’s much more output than in Step 3, including an error message that indicates this time the request body exceeds 20 bytes:
curl -d '{ "text": "hello, world" }' -H "Content-Type: application/json" -X POST http://localhost:4000/conversations...
\”PayloadTooLargeError: request entity too large"
Example 2
This example uses convict, a library that lets you define an entire configuration “schema” in a single file. It also illustrates two guidelines from Factor 3 of the twelve‑factor app:
- Store configuration in environment variables – You modify the app so that the maximum body size is set using an environment variable (
JSON_BODY_LIMIT) instead of being hardcoded in the app code. - Clearly define your service configuration – This is an adaptation of Factor 3 for microservices. If you’re unfamiliar with this concept, we recommend that you take a moment to read about it in Best Practices for Configuring Microservices Apps on our blog.
The example also sets up some “plumbing” you’ll take advantage of in Challenge 2: the messenger deployment script you’ll create in that challenge sets the JSON_BODY_LIMIT environment variable which you insert into the app code here, as an illustration of configuration specified in a deployment script.
- Open the
convictconfiguration file, app/config/config.mjs, and add the following as a new key after theamqpportkey:
jsonBodyLimit: {  doc: `The max size (with unit included) that will be parsed by the
        JSON middleware. Unit parsing is done by the
        https://www.npmjs.com/package/bytes library.
        ex: "100kb"`,
  format: String,
  default: null,
  env: "JSON_BODY_LIMIT",
},- The
convictlibrary takes care of parsing theJSON_BODY_LIMITenvironment variable when you use it to set the maximum body size on the command line in Step 3 below:- Pulls the value from the correct environment variable
- Checks the variable’s type (
String) - Enables access to it in the application under the
jsonBodyLimitkey
- In app/index.mjs replace:
app.use(express.json({ limit: "20b" }));- with
app.use(express.json({ limit: config.get("jsonBodyLimit") }));- In the app terminal (where you started the messenger service in Step 2 of Example 1), press
Ctrl+cto stop the service. Then start it again, using theJSON_BODY_LIMITenvironment variable to set the maximum body size to 27 bytes:
^cJSON_BODY_LIMIT=27b node index.mjs- This is an example of modifying the configuration method when doing so makes sense for your use case – you’ve switched from hardcoding a value (in this case a size limit) in the app code to setting it with an environment variable, as recommended by the twelve-factor app. As mentioned above, in Challenge 2 the use of the
JSON_BODY_LIMITenvironment variable will become an example of the second location for configuration, when you use the messenger service’s deployment script to set the environment variable rather than setting it on the command line. - In the client terminal, repeat the
curlcommand from Step 4 of Example 1 (with the larger request body). Because you’ve now increased the size limit to 27 bytes, the request body no longer exceeds the limit and you get the error message that indicates the request was processed, but that the content of the JSON payload is incorrect:
curl -d '{ "text": "hello, world" }' -H "Content-Type: application/json" -X POST http://localhost:4000/conversations{ "error": "Conversation must have 2 unique users" }- You can close the client terminal if you wish. You’ll issue all commands in the rest of the tutorial in the app terminal.
- In the app terminal, press
Ctrl+cto stop the messenger service (you stopped and restarted the service in this terminal in Step 3 above).
^c- Stop the messenger-database. You can safely ignore the error message shown, as the network is still in use by the infrastructure elements defined in the platform repository. Run this command at the root of the messenger repo.
docker compose down
...failed to remove network mm_2023....
Challenge 2: Create Deployment Scripts for a Service
“ Configuration should be strictly separated from code (otherwise how can it vary between deploys?)” – From Factor 3 of the twelve‑factor app
At first glance, you might interpret this as saying “do not check configuration in to source control”. In this challenge, you implement a common pattern for microservices environments that may seem to break this rule, but in reality respects the rule while providing valuable process improvements that are critical for microservices environments.
In this challenge, you create deployment scripts to mimic the functionality of infrastructure-as-code and deployment manifests which provide configuration to a microservice, modify the scripts to use external sources of configuration, set a secret, and then run the scripts to deploy services and their infrastructure.
You create the deployment scripts in a newly created infrastructure directory in the messenger repo. A directory called infrastructure (or some variation of that name) is a common pattern in modern microservice architectures, used to store things like:
- Infrastructure as code (think Terraform, AWS CloudFormation, Google Cloud Deployment Manager, and Azure Resource Manager)
- Configuration for the container orchestration system (for example, Helm charts and Kubernetes manifests)
- Any other files related to the deployment of applications
The benefits of this pattern include:
- It assigns ownership of the service deployment and the deployment of service‑specific infrastructure (such as databases) to the team that owns the service.
- The team can ensure changes to any of these elements go through its development process (code review, CI, etc.).
- The team can easily make changes to how the service and its supporting infrastructure are deployed without depending on outside teams doing work for them.
As mentioned previously, our intention for the tutorial is not to show how to set up a real system, and the scripts you deploy in this challenge do not resemble a real production system. Rather, they illustrate some core concepts and problems solved by tool‑specific configuration when dealing with microservices‑related infrastructure deployment, while also abstracting the scripts to the minimum amount of specific tooling possible.
Create Initial Deployment Scripts
- In the app terminal, create an infrastructure directory at the root of the messenger repo and create files to contain the deployment scripts for the messenger service and the messenger-database. Depending on your environment, you might need to prefix the
chmodcommands withsudo:
mkdir infrastructurecd infrastructure touch messenger-deploy.sh chmod +x messenger-deploy.sh touch messenger-db-deploy.sh chmod +x messenger-db-deploy.sh- In your preferred text editor, open messenger-deploy.sh and add the following to create an initial deployment script for the messenger service:
#!/bin/bashset -e

JSON_BODY_LIMIT=20b

docker run \
  --rm \
  -e JSON_BODY_LIMIT="${JSON_BODY_LIMIT}" \
  messenger
This script isn’t complete at this point, but it illustrates a couple concepts:
- It assigns a value to environment variables by including that configuration directly in the deployment script.
- It uses the
-eflag on thedockerruncommand to inject environment variables into the container at runtime.
It may seem redundant to set the value of environment variables this way, but it means that – no matter how complex this deployment script becomes – you can take a quick look at the very top of the script and understand how configuration data is being provided to the deployment.
Additionally, although a real deployment script may not explicitly invoke the docker run command, this sample script is meant to convey the core problems being solved by something like a Kubernetes manifest. When using a container orchestration system like Kubernetes, a deployment starts a container and the application configuration derived from your Kubernetes configuration files is made available to that container. Thus, we can consider this sample deployment file to be a minimal version of a deployment script that plays the same role as framework‑specific deployment files like Kubernetes manifests.
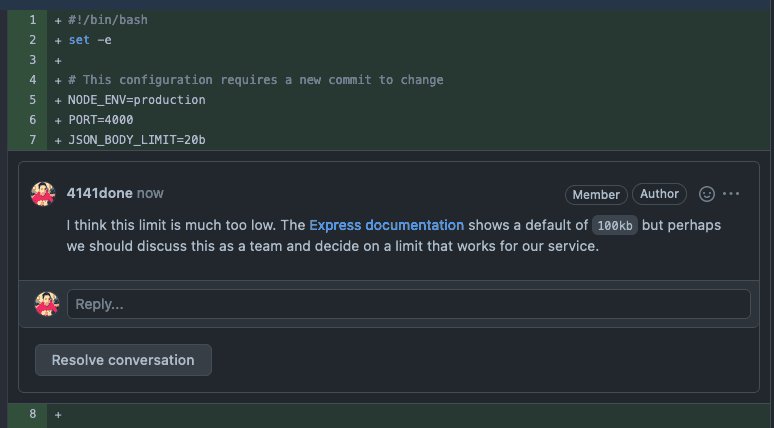
In a real development environment, you might check this file into source control and put it through code review. This gives the rest of your team an opportunity to comment on your settings and thus helps avoid incidents where misconfigured values lead to unexpected behavior. For example, in this screenshot a team member is rightly pointing out that a limit of 20 bytes for incoming JSON request bodies (set with JSON_BODY_LIMIT) is too low.
Modify Deployment Scripts to Query Configuration Values from External Sources
In this part of the challenge, you set up the third location for a microservice’s configuration: an external source that is queried at deployment time. Dynamically registering values and fetching them from an outside source at deployment time is a much better practice than hardcoding values, which must be updated constantly and can cause failures. For a discussion, see Best Practices for Configuring Microservices Apps on our blog.
At this point two infrastructure components are running in the background to provide auxiliary services required by the messenger service:
- RabbitMQ, owned by the Platform team in a real deployment (started in Step 3 of Set Up)
- The messenger-database, owned by your team in a real deployment (started in Step 4 of Set Up)
The convict schema for the messenger service in app/config/config.mjs defines the required environment variables corresponding to these pieces of external configuration. In this section you set up these two components to provide configuration by setting the values of the variables in a commonly accessible location so that they can be queried by the messenger service when it deploys.
The required connection information for RabbitMQ and the messenger-database is registered in the Consul Key/Value (KV) store, which is a common location accessible to all services as they are deployed. The Consul KV store is not a standard place to store this type of data, but this tutorial uses it for simplicity’s sake.
- Replace the contents of infrastructure/messenger-deploy.sh (created in Step 2 of the previous section) with the following:
#!/bin/bashset -e

# This configuration requires a new commit to change
NODE_ENV=production
PORT=4000
JSON_BODY_LIMIT=100kb

# Postgres database configuration by pulling information from
# the system
POSTGRES_USER=$(curl -X GET http://localhost:8500/v1/kv/messenger-db-application-user?raw=true)
PGPORT=$(curl -X GET http://localhost:8500/v1/kv/messenger-db-port?raw=true)
PGHOST=$(curl -X GET http://localhost:8500/v1/kv/messenger-db-host?raw=true)

# RabbitMQ configuration by pulling from the system
AMQPHOST=$(curl -X GET http://localhost:8500/v1/kv/amqp-host?raw=true)
AMQPPORT=$(curl -X GET http://localhost:8500/v1/kv/amqp-port?raw=true)

docker run \
  --rm \
  -e NODE_ENV="${NODE_ENV}" \
  -e PORT="${PORT}" \
  -e JSON_BODY_LIMIT="${JSON_BODY_LIMIT}" \
  -e PGUSER="${POSTGRES_USER}" \
  -e PGPORT="${PGPORT}" \
  -e PGHOST="${PGHOST}" \
  -e AMQPPORT="${AMQPPORT}" \
  -e AMQPHOST="${AMQPHOST}" \
messenger- This script exemplifies two types of configuration:
- Configuration specified directly in the deployment script – It sets the deployment environment (
NODE_ENV) and port (PORT), and changesJSON_BODY_LIMITto 100 KB, a more realistic value than 20 bytes. - Configuration queried from external sources – It fetches the values of the
POSTGRES_USER,PGPORT,PGHOST,AMQPHOST, andAMQPPORTenvironment variables from the Consul KV store. You set the values of the environment variables in the Consul KV store in the following two steps.
- Configuration specified directly in the deployment script – It sets the deployment environment (
- Open messenger-db-deploy.sh and add the following to create an initial deployment script for the messenger-database:
#!/bin/bashset -e

PORT=5432
POSTGRES_USER=postgres

docker run \
  -d \
  --rm \
  --name messenger-db \
  -v db-data:/var/lib/postgresql/data/pgdata \
  -e POSTGRES_USER="${POSTGRES_USER}" \
  -e POSTGRES_PASSWORD="${POSTGRES_PASSWORD}" \
  -e PGPORT="${PORT}" \
  -e PGDATA=/var/lib/postgresql/data/pgdata \
  --network mm_2023 \
  postgres:15.1

# Register details about the database with Consul
curl -X PUT http://localhost:8500/v1/kv/messenger-db-port \
  -H "Content-Type: application/json" \
  -d "${PORT}"

curl -X PUT http://localhost:8500/v1/kv/messenger-db-host \
  -H "Content-Type: application/json" \
  -d 'messenger-db' # This matches the "--name" flag above
                    # (the hostname)

curl -X PUT http://localhost:8500/v1/kv/messenger-db-application-user \
  -H "Content-Type: application/json" \
-d "${POSTGRES_USER}"- In addition to defining configuration that can be queried by the messenger service at deployment time, the script illustrates the same two concepts as the initial script for the messenger service from Create Initial Deployment Scripts):
- It specifies certain configuration directly in the deployment script, in this case to tell the PostgreSQL database the port on which to run and the username of the default user.
- It runs Docker with the
-eflag to inject environment variables into the container at runtime. It also sets the name of the running container to messenger-db, which becomes the hostname of the database in the Docker network you created when you launched the platform service in Step 2 of Set Up.
- In a real deployment, it’s usually the Platform team (or similar) that handles the deployment and maintenance of a service like RabbitMQ in the platform repo, like you do for the messenger-database in the messenger repo. The Platform team then makes sure that the location of that infrastructure is discoverable by services that depend on it. For the purposes of the tutorial, set the RabbitMQ values yourself:
curl -X PUT --silent --output /dev/null --show-error --fail \ -H "Content-Type: application/json" \ -d "rabbitmq" \ http://localhost:8500/v1/kv/amqp-host curl -X PUT --silent --output /dev/null --show-error --fail \ -H "Content-Type: application/json" \ -d "5672" \ http://localhost:8500/v1/kv/amqp-port- (You might wonder why
amqpis used to define RabbitMQ variables – it’s because AMQP is the protocol used by RabbitMQ.)
Set a Secret in the Deployment Scripts
There is only one (critical) piece of data missing in the deployment scripts for the messenger service – the password for the messenger-database!
Note: Secrets management is not the focus of this tutorial, so for simplicity the secret is defined in deployment files. Never do this in an actual environment – development, test, or production – it creates a huge security risk.
To learn about proper secrets management, check out Unit 2, Microservices Secrets Management 101 of Microservices March 2023. (Spoiler: a secrets management tool is the only truly secure method for storing secrets).
- Replace the contents of infrastructure/messenger-db-deploy.sh with the following to store the password secret for the messenger-database in the Consul KV store:
#!/bin/bashset -e

PORT=5432
POSTGRES_USER=postgres
# NOTE: Never do this in a real-world deployment. Store passwords
# only in an encrypted secrets store.
POSTGRES_PASSWORD=postgres

docker run \
  --rm \
  --name messenger-db-primary \
  -d \
  -v db-data:/var/lib/postgresql/data/pgdata \
  -e POSTGRES_USER="${POSTGRES_USER}" \
  -e POSTGRES_PASSWORD="${POSTGRES_PASSWORD}" \
  -e PGPORT="${PORT}" \
  -e PGDATA=/var/lib/postgresql/data/pgdata \
  --network mm_2023 \
  postgres:15.1

echo "Register key messenger-db-port\n"
curl -X PUT --silent --output /dev/null --show-error --fail http://localhost:8500/v1/kv/messenger-db-port \
  -H "Content-Type: application/json" \
  -d "${PORT}"

echo "Register key messenger-db-host\n"
curl -X PUT --silent --output /dev/null --show-error --fail http://localhost:8500/v1/kv/messenger-db-host \
  -H "Content-Type: application/json" \
  -d 'messenger-db-primary' # This matches the "--name" flag above
                            # which for our setup means the hostname

echo "Register key messenger-db-application-user\n"
curl -X PUT --silent --output /dev/null --show-error --fail http://localhost:8500/v1/kv/messenger-db-application-user \
  -H "Content-Type: application/json" \
  -d "${POSTGRES_USER}"

echo "Register key messenger-db-password-never-do-this\n"
curl -X PUT --silent --output /dev/null --show-error --fail http://localhost:8500/v1/kv/messenger-db-password-never-do-this \
  -H "Content-Type: application/json" \
  -d "${POSTGRES_PASSWORD}"

printf "\nDone registering postgres details with Consul\n"- Replace the contents of infrastructure/messenger-deploy.sh with the following to fetch the messenger-database password secret from the Consul KV store:
#!/bin/bashset -e

# This configuration requires a new commit to change
NODE_ENV=production
PORT=4000
JSON_BODY_LIMIT=100kb

# Postgres database configuration by pulling information from
# the system
POSTGRES_USER=$(curl -X GET http://localhost:8500/v1/kv/messenger-db-application-user?raw=true)
PGPORT=$(curl -X GET http://localhost:8500/v1/kv/messenger-db-port?raw=true)
PGHOST=$(curl -X GET http://localhost:8500/v1/kv/messenger-db-host?raw=true)
# NOTE: Never do this in a real-world deployment. Store passwords
# only in an encrypted secrets store.
PGPASSWORD=$(curl -X GET http://localhost:8500/v1/kv/messenger-db-password-never-do-this?raw=true)

# RabbitMQ configuration by pulling from the system
AMQPHOST=$(curl -X GET http://localhost:8500/v1/kv/amqp-host?raw=true)
AMQPPORT=$(curl -X GET http://localhost:8500/v1/kv/amqp-port?raw=true)

docker run \
  --rm \
  -d \
  -e NODE_ENV="${NODE_ENV}" \
  -e PORT="${PORT}" \
  -e JSON_BODY_LIMIT="${JSON_BODY_LIMIT}" \
  -e PGUSER="${POSTGRES_USER}" \
  -e PGPORT="${PGPORT}" \
  -e PGHOST="${PGHOST}" \
  -e PGPASSWORD="${PGPASSWORD}" \
  -e AMQPPORT="${AMQPPORT}" \
  -e AMQPHOST="${AMQPHOST}" \
  --network mm_2023 \
  messenger
Run the Deployment Scripts
- Change to the app directory in the messenger repo and build the Docker image for the messenger service:
cd ../appdocker build -t messenger .- Verify that only the containers that belong to the platform service are running:
docker ps --format '{{.Names}}'consul-server
consul-client
rabbitmq- Change to the root of the messenger repository and deploy the messenger-database and the messenger service:
cd .../infrastructure/messenger-db-deploy.sh ./infrastructure/messenger-deploy.sh- The messenger-db-deploy.sh script starts the messenger-database and registers the appropriate information with the system (which in this case is the Consul KV store). The messenger-deploy.sh script then starts the application and pulls the configuration registered by messenger-db-deploy.sh from the system (again, the Consul KV store). Hint: If a container fails to start, remove the second parameter to the
dockerruncommand ( the-d\line) in the deployment script and run the script again. The container then starts in the foreground, which means its logs appear in the terminal and might identify the problem. When you resolve the problem, restore the-d\line so that the actual container runs in the background. - Send a simple health‑check request to the application to verify that deployment succeeded:
curl localhost:4000/healthcurl: (7) Failed to connect to localhost port 4000 after 11 ms: Connection refused- Oops, failure! As it turns out, you are still missing one critical piece of configuration and the messenger service is not exposed to the wider system. It’s running happily inside the mm_2023 network, but that network is only accessible from within Docker.
- Stop the running container in preparation for creating a new image in the next challenge:
docker rm $(docker stop $(docker ps -a -q --filter ancestor=messenger --format="{{.ID}}"))Challenge 3: Expose a Service to the Outside World
In a production environment, you don’t generally expose services directly. Instead, you follow a common microservices pattern and place a reverse proxy service in front of your main service.
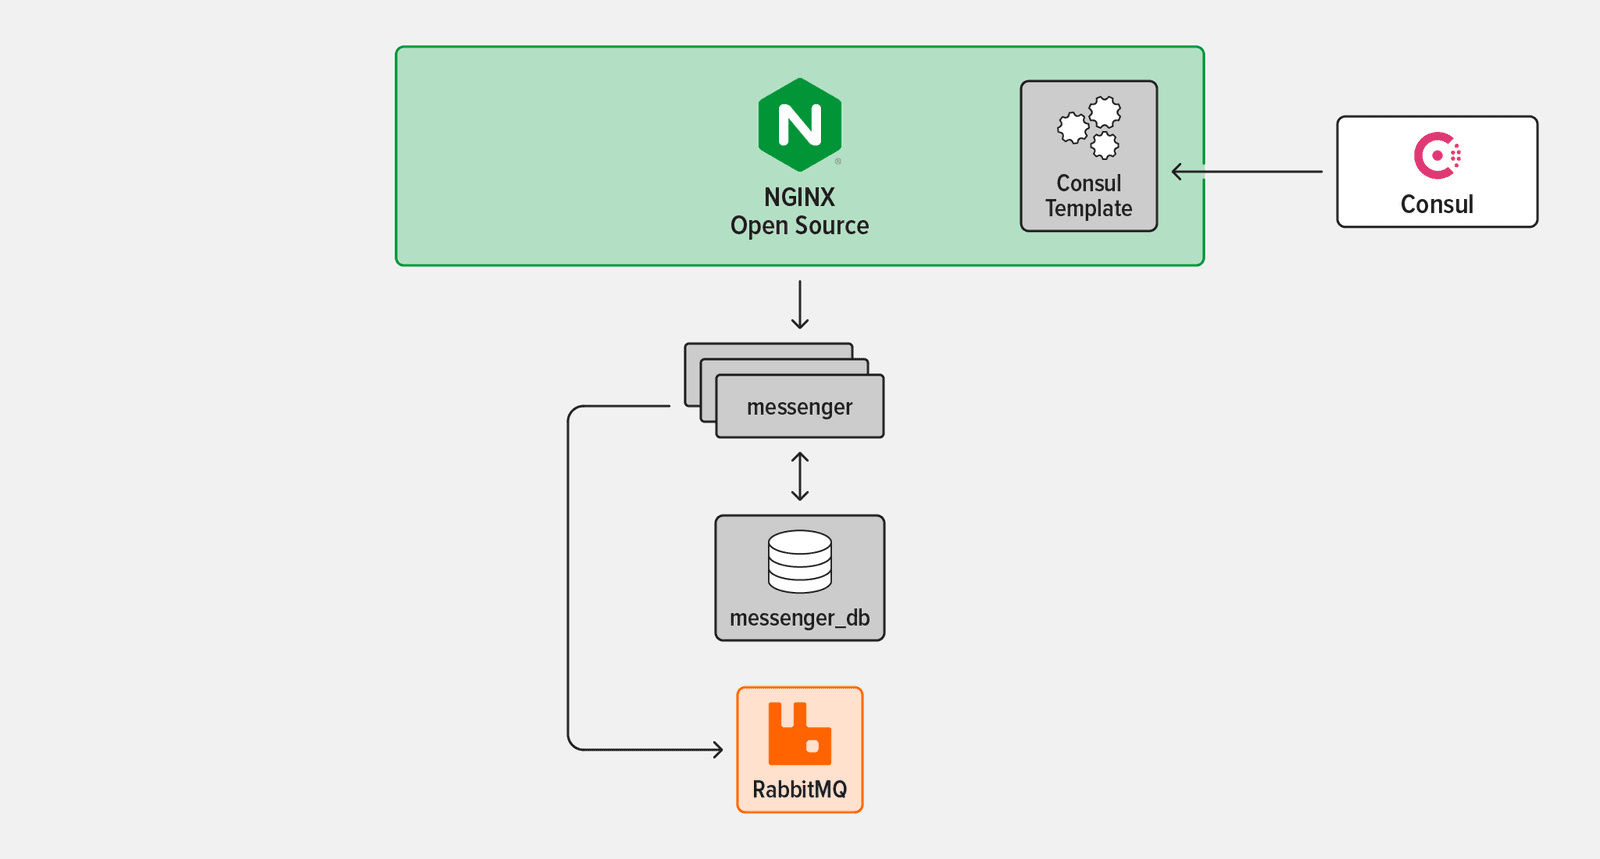
In this challenge, you expose the messenger service to the outside world by setting up service discovery: the registration of new service information and dynamic updating of that information as accessed by other services. To do this, you use these technologies:
- Consul, a dynamic service registry, and Consul template, a tool for dynamically updating a file based on Consul data
- NGINX Open Source, as a reverse proxy and load balancer that exposes a single entry point for your messenger service which will be composed of multiple individual instances of the application running in containers
To learn more about service discovery, see Making a Service Available as Configuration in Best Practices for Configuring Microservices Apps on our blog.
Set Up Consul
The app/consul/index.mjs file in the messenger repo contains all the code necessary to register the messenger service with Consul at startup and deregister it at graceful shutdown. It exposes one function, register, which registers any newly deployed service with Consul’s service registry.
- In your preferred text editor, open app/index.mjs and add the following snippet after the other
importstatements, to import theregisterfunction from app/consul/index.mjs:
import { register as registerConsul } from "./consul/index.mjs";- Then modify the
SERVERSTARTsection at the end of the script as shown, to callregisterConsul()after the application has started:
/* =================  SERVER START
================== */
app.listen(port, async () => {
  console.log(`messenger_service listening on port ${port}`);
  registerConsul();
});

export default app;- Open the
convictschema in app/config/config.mjs and add the following configuration values after thejsonBodyLimitkey you added in Step 1 of Example 2.
  consulServiceName: {    doc: "The name by which the service is registered in Consul. If not specified, the service is not registered",
    format: "*",
    default: null,
    env: "CONSUL_SERVICE_NAME",
  },
  consulHost: {
    doc: "The host where the Consul client runs",
    format: String,
    default: "consul-client",
    env: "CONSUL_HOST",
  },
  consulPort: {
    doc: "The port for the Consul client",
    format: "port",
    default: 8500,
    env: "CONSUL_PORT",
},- This configures the name under which a new service is registered and defines the hostname and port for the Consul client. In the next step you modify the deployment script for the messenger service to include this new Consul connection and service registration information.
- Open infrastructure/messenger-deploy.sh and replace its contents with the following to include in the messenger service configuration the Consul connection and service registration information you set in the previous step:
#!/bin/bashset -e

# This configuration requires a new commit to change
NODE_ENV=production
PORT=4000
JSON_BODY_LIMIT=100kb

CONSUL_SERVICE_NAME="messenger"

# Consul host and port are included in each host since we
# cannot query Consul until we know them
CONSUL_HOST="${CONSUL_HOST}"
CONSUL_PORT="${CONSUL_PORT}"

# Postgres database configuration by pulling information from
# the system
POSTGRES_USER=$(curl -X GET "http://localhost:8500/v1/kv/messenger-db-application-user?raw=true")
PGPORT=$(curl -X GET "http://localhost:8500/v1/kv/messenger-db-port?raw=true")
PGHOST=$(curl -X GET "http://localhost:8500/v1/kv/messenger-db-host?raw=true")
# NOTE: Never do this in a real-world deployment. Store passwords
# only in an encrypted secrets store.
PGPASSWORD=$(curl -X GET "http://localhost:8500/v1/kv/messenger-db-password-never-do-this?raw=true")

# RabbitMQ configuration by pulling from the system
AMQPHOST=$(curl -X GET "http://localhost:8500/v1/kv/amqp-host?raw=true")
AMQPPORT=$(curl -X GET "http://localhost:8500/v1/kv/amqp-port?raw=true")

docker run \
  --rm \
  -d \
  -e NODE_ENV="${NODE_ENV}" \
  -e PORT="${PORT}" \
  -e JSON_BODY_LIMIT="${JSON_BODY_LIMIT}" \
  -e PGUSER="${POSTGRES_USER}" \
  -e PGPORT="${PGPORT}" \
  -e PGHOST="${PGHOST}" \
  -e PGPASSWORD="${PGPASSWORD}" \
  -e AMQPPORT="${AMQPPORT}" \
  -e AMQPHOST="${AMQPHOST}" \
  -e CONSUL_HOST="${CONSUL_HOST}" \
  -e CONSUL_PORT="${CONSUL_PORT}" \
  -e CONSUL_SERVICE_NAME="${CONSUL_SERVICE_NAME}" \
  --network mm_2023 \
messenger- The main things to note are: Note: In a real‑world deployment, this is an example of configuration which must be agreed upon between teams – the team responsible for Consul must provide the
CONSUL_HOSTandCONSUL_PORTenvironment variables in all environments since a service cannot query Consul without this connection information.- The
CONSUL_SERVICE_NAMEenvironment variable tells the messenger service instance what name to use as it registers itself with Consul. - The
CONSUL_HOSTandCONSUL_PORTenvironment variables are for the Consul client running at the location where the deployment script runs.
- The
- In the app terminal, change to the app directory, stop any running instances of the messenger service, and rebuild the Docker image to bake in the new service registration code:
cd appdocker rm $(docker stop $(docker ps -a -q --filter ancestor=messenger --format="{{.ID}}")) docker build -t messenger .- Navigate to http://localhost:8500 in a browser to see the Consul UI in action (though nothing interesting is happening yet).
- At the root of the messenger repository, run the deployment script to start an instance of the messenger service:
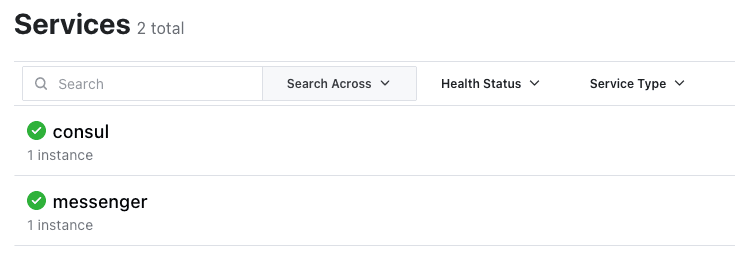
CONSUL_HOST=consul-client CONSUL_PORT=8500 ./infrastructure/messenger-deploy.sh- In the Consul UI in the browser, click Services in the header bar to verify that a single messenger service is running.
- Run the deployment script a few more times to start more instances of the messenger service. Verify in the Consul UI that they’re running.
CONSUL_HOST=consul-client CONSUL_PORT=8500 ./infrastructure/messenger-deploy.sh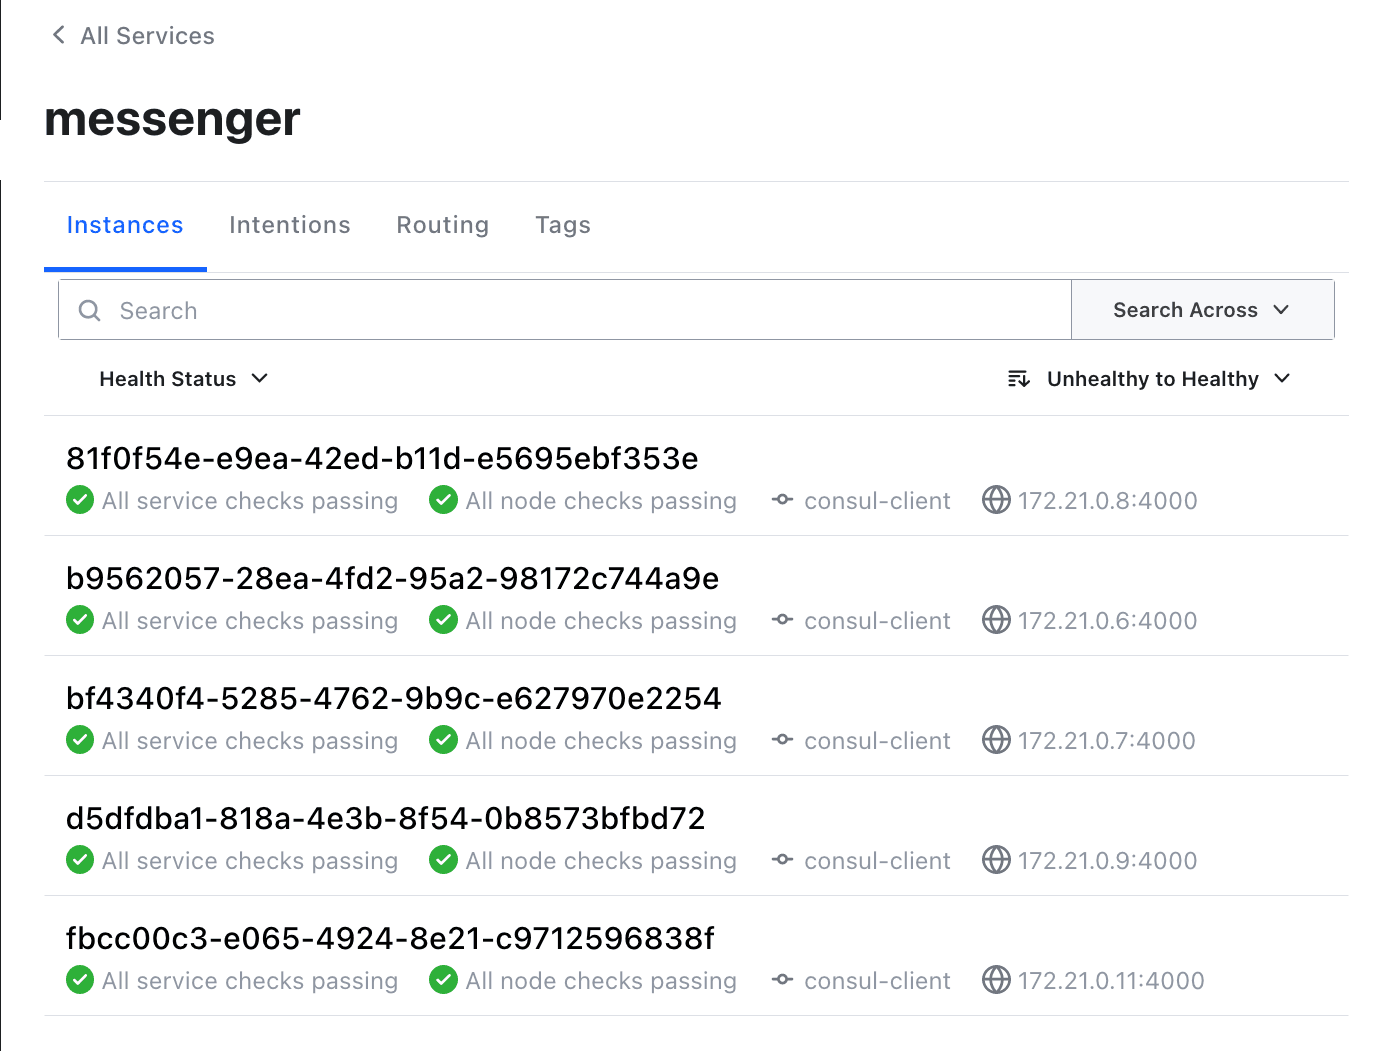
Set Up NGINX
The next step is to add NGINX Open Source as a reverse proxy and load balancer to route incoming traffic to all the running messenger instances.
- In the app terminal, change directory to the root of the messenger repo and create a directory called load-balancer and three files:
mkdir load-balancercd load-balancer touch nginx.ctmpl touch consul-template-config.hcl touch Dockerfile- The Dockerfile defines the container where NGINX and Consul template run. Consul template uses the other two files to dynamically update the NGINX upstreams when the messenger service changes (service instances come up or go down) in its service registry.
- Open the nginx.ctmpl file created in Step 1 and add the following NGINX configuration snippet, which Consul template uses to dynamically update the NGINX upstream group:
upstream messenger_service {    {{- range service "messenger" }}
    server {{ .Address }}:{{ .Port }};
    {{- end }}
}

server {
    listen 8085;
    server_name localhost;

    location / {
        proxy_pass http://messenger_service;
        add_header Upstream-Host $upstream_addr;
    }
}- This snippet adds the IP address and port number of each messenger service instance as registered with Consul to the NGINX messenger_service upstream group. NGINX proxies incoming requests to the dynamically defined set of upstream service instances.
- Open the consul-template-config.hcl file created in Step 1 and add the following config:
consul {  address = "consul-client:8500"

  retry {
    enabled  = true
    attempts = 12
    backoff  = "250ms"
  }
}
template {
  source      = "/usr/templates/nginx.ctmpl"
  destination = "/etc/nginx/conf.d/default.conf"
  perms       = 0600
  command     = "if [ -e /var/run/nginx.pid ]; then nginx -s reload; else nginx; fi"
}- This config for Consul template tells it to re‑render the
sourcetemplate (the NGINX configuration snippet created in the previous step), place it at the specifieddestination, and finally run the specifiedcommand(which tells NGINX to reload its configuration). In practice this means that a new default.conf file is created every time a service instance is registered, updated, or deregistered in Consul. NGINX then reloads its configuration with no downtime, ensuring NGINX has an up-to-date, healthy set of servers (messenger service instances) to which it can send traffic. - Open the Dockerfile file created in Step 1 and add the following contents, which builds the NGINX service. (You don’t need to understand the Dockerfile for the purposes of this tutorial, but the code is documented in‑line for your convenience.)
FROM nginx:1.23.1
ARG CONSUL_TEMPLATE_VERSION=0.30.0

# Set an environment variable for the location of the Consul
# cluster. By default, it tries to resolve to consul-client:8500
# which is the behavior if Consul is running as a container in the
# same host and linked to this NGINX container (with the alias
# consul, of course). But this environment variable can also be
# overridden as the container starts if we want to resolve to
# another address.

ENV CONSUL_URL consul-client:8500

# Download the specified version of Consul template
ADD https://releases.hashicorp.com/consul-template/${CONSUL_TEMPLATE_VERSION}/consul-template_${CONSUL_TEMPLATE_VERSION}_linux_amd64.zip /tmp

RUN apt-get update \
  && apt-get install -y --no-install-recommends dumb-init unzip \
  && unzip /tmp/consul-template_${CONSUL_TEMPLATE_VERSION}_linux_amd64.zip -d /usr/local/bin \
  && rm -rf /tmp/consul-template_${CONSUL_TEMPLATE_VERSION}_linux_amd64.zip

COPY consul-template-config.hcl ./consul-template-config.hcl
COPY nginx.ctmpl /usr/templates/nginx.ctmpl

EXPOSE 8085

STOPSIGNAL SIGQUIT

CMD ["dumb-init", "consul-template", "-config=consul-template-config.hcl"]- Build a Docker image:
docker build -t messenger-lb .- Change to the root of the messenger directory, create a file named messenger-load-balancer-deploy.sh as a deployment file for the NGINX service (just like with the rest of the services you have deployed throughout the tutorial). Depending on your environment, you might need to prefix the
chmodcommand withsudo:
cd .. touch infrastructure/messenger-load-balancer-deploy.sh chmod +x infrastructure/messenger-load-balancer-deploy.sh- Open messenger-load-balancer-deploy.sh and add the following contents:
#!/bin/bashset -e

# Consul host and port are included in each host since we
# cannot query Consul until we know them
CONSUL_HOST="${CONSUL_HOST}"
CONSUL_PORT="${CONSUL_PORT}"

docker run \
  --rm \
  -d \
  --name messenger-lb \
  -e CONSUL_URL="${CONSUL_HOST}:${CONSUL_PORT}"  \
  -p 8085:8085 \
  --network mm_2023 \
messenger-lb- Now that you have everything in place, deploy the NGINX service:
CONSUL_HOST=consul-client CONSUL_PORT=8500 ./infrastructure/messenger-load-balancer-deploy.sh- See if you can access the messenger service externally:
curl -X GET http://localhost:8085/health
OK- It works! NGINX is now load balancing across all instances of the messenger service that have been created. You can tell because the
X-Forwarded-Forheader is showing the same messenger service IP addresses as the ones in the Consul UI in Step 8 of the previous section.
Challenge 4: Migrate a Database Using a Service as a Job Runner
Large applications often make use of “job runners” with small worker processes that can be used to do one‑off tasks like modify data (examples are Sidekiq and Celery). These tools often require additional supporting infrastructure such as Redis or RabbitMQ. In this case, you use the messenger service itself as a “job runner” to run one‑off tasks. This makes sense because it’s so small already, is fully capable of interacting with the database and other pieces of infrastructure on which it depends, and is running completely separately from the application that is serving traffic.
There are three benefits to doing this:
- The job runner (including the scripts it runs) goes through exactly the same checks and review process as the production service.
- Configuration values such as database users can easily be changed to make the production deployment more secure. For example, you can run the production service with a “low privilege” user that can only write and query from existing tables. You can configure a different service instance to make changes to the database structure as a higher‑privileged user able to create and remove tables.
- Some teams run jobs from instances that are also handling service production traffic. This is dangerous because issues with the job can impact the other functions the application in the container is performing. Avoiding things like that is why we’re doing microservices in the first place, isn’t it?
In this challenge you explore how an artifact can be modified to fill a new role by changing some database configuration values and migrating the messenger database to use the new values and testing its performance.
Migrate the messenger Database
For a real‑world production deployment, you might create two distinct users with different permissions: an “application user” and a “migrator user”. For simplicity’s sake, in this example you use the default user as the application user and create a migrator user with superuser privileges. In a real situation, it’s worth spending more time deciding which specific minimal permissions are needed by each user based on its role.
- In the app terminal, create a new PostgreSQL user with superuser privileges:
echo "CREATE USER messenger_migrator WITH SUPERUSER PASSWORD 'migrator_password';" | docker exec -i messenger-db-primary psql -U postgres- Open the database deployment script (infrastructure/messenger-db-deploy.sh) and replace its contents to add the new user’s credentials. Note: Let’s take the time to reiterate – for a real‑world deployment, NEVER put secrets like database credentials in a deployment script or anywhere other than a secrets management tool. For details, see Unit 2: Microservices Secrets Management 101 of Microservices March 2023.
#!/bin/bash
set -e

PORT=5432
POSTGRES_USER=postgres
# NOTE: Never do this in a real-world deployment. Store passwords
# only in an encrypted secrets store.
# Because we’re focusing on other concepts in this tutorial, we
# set the password this way here for convenience.
POSTGRES_PASSWORD=postgres

# Migration user
POSTGRES_MIGRATOR_USER=messenger_migrator
# NOTE: As above, never do this in a real deployment.
POSTGRES_MIGRATOR_PASSWORD=migrator_password

docker run \
  --rm \
  --name messenger-db-primary \
  -d \
  -v db-data:/var/lib/postgresql/data/pgdata \
  -e POSTGRES_USER="${POSTGRES_USER}" \
  -e POSTGRES_PASSWORD="${POSTGRES_PASSWORD}" \
  -e PGPORT="${PORT}" \
  -e PGDATA=/var/lib/postgresql/data/pgdata \
  --network mm_2023 \
  postgres:15.1

echo "Register key messenger-db-port\n"
curl -X PUT --silent --output /dev/null --show-error --fail http://localhost:8500/v1/kv/messenger-db-port \
  -H "Content-Type: application/json" \
  -d "${PORT}"

echo "Register key messenger-db-host\n"
curl -X PUT --silent --output /dev/null --show-error --fail http://localhost:8500/v1/kv/messenger-db-host \
  -H "Content-Type: application/json" \
  -d 'messenger-db-primary' # This matches the "--name" flag above
                            # which for our setup means the hostname

echo "Register key messenger-db-application-user\n"
curl -X PUT --silent --output /dev/null --show-error --fail http://localhost:8500/v1/kv/messenger-db-application-user \
  -H "Content-Type: application/json" \
  -d "${POSTGRES_USER}"

curl -X PUT --silent --output /dev/null --show-error --fail http://localhost:8500/v1/kv/messenger-db-password-never-do-this \
  -H "Content-Type: application/json" \
  -d "${POSTGRES_PASSWORD}"

echo "Register key messenger-db-application-user\n"
curl -X PUT --silent --output /dev/null --show-error --fail http://localhost:8500/v1/kv/messenger-db-migrator-user \
  -H "Content-Type: application/json" \
  -d "${POSTGRES_MIGRATOR_USER}"

curl -X PUT --silent --output /dev/null --show-error --fail http://localhost:8500/v1/kv/messenger-db-migrator-password-never-do-this \
  -H "Content-Type: application/json" \
  -d "${POSTGRES_MIGRATOR_PASSWORD}"

printf "\nDone registering postgres details with Consul\n"- This change just adds the migrator user to the set of users that is set in Consul after the database deploys.
- Create a new file in the infrastructure directory called messenger-db-migrator-deploy.sh (again, you might need to prefix the
chmodcommand withsudo):
touch infrastructure/messenger-db-migrator-deploy.shchmod +x infrastructure/messenger-db-migrator-deploy.sh- Open messenger-db-migrator-deploy.sh and add the following:
#!/bin/bashset -e

# This configuration requires a new commit to change
NODE_ENV=production
PORT=4000
JSON_BODY_LIMIT=100kb

CONSUL_SERVICE_NAME="messenger-migrator"

# Consul host and port are included in each host since we
# cannot query Consul until we know them
CONSUL_HOST="${CONSUL_HOST}"
CONSUL_PORT="${CONSUL_PORT}"

# Get the migrator user name and password
POSTGRES_USER=$(curl -X GET "http://localhost:8500/v1/kv/messenger-db-migrator-user?raw=true")
PGPORT=$(curl -X GET "http://localhost:8500/v1/kv/messenger-db-port?raw=true")
PGHOST=$(curl -X GET http://localhost:8500/v1/kv/messenger-db-host?raw=true)
# NOTE: Never do this in a real-world deployment. Store passwords
# only in an encrypted secrets store.
PGPASSWORD=$(curl -X GET "http://localhost:8500/v1/kv/messenger-db-migrator-password-never-do-this?raw=true")

# RabbitMQ configuration by pulling from the system
AMQPHOST=$(curl -X GET "http://localhost:8500/v1/kv/amqp-host?raw=true")
AMQPPORT=$(curl -X GET "http://localhost:8500/v1/kv/amqp-port?raw=true")

docker run \--rm \
  -d \
  --name messenger-migrator \
  -e NODE_ENV="${NODE_ENV}" \
  -e PORT="${PORT}" \
  -e JSON_BODY_LIMIT="${JSON_BODY_LIMIT}" \
  -e PGUSER="${POSTGRES_USER}" \
  -e PGPORT="${PGPORT}" \
  -e PGHOST="${PGHOST}" \
  -e PGPASSWORD="${PGPASSWORD}" \
  -e AMQPPORT="${AMQPPORT}" \
  -e AMQPHOST="${AMQPHOST}" \
  -e CONSUL_HOST="${CONSUL_HOST}" \
  -e CONSUL_PORT="${CONSUL_PORT}" \
  -e CONSUL_SERVICE_NAME="${CONSUL_SERVICE_NAME}" \
  --network mm_2023 \
messenger- This script is quite similar to the infrastructure/messenger-deploy.sh script in its final form, which you created in Step 3 of Set Up Consul. The main difference is that the
CONSUL_SERVICE_NAMEismessenger-migratorinstead ofmessenger, and thePGUSERcorresponds to the “migrator” superuser you created in Step 1 above. It’s important that theCONSUL_SERVICE_NAMEismessenger-migrator. If it were set tomessenger, NGINX would automatically put this service into rotation to receive API calls and it’s not meant to be handling any traffic. The script deploys a short‑lived instance in the role of migrator. This prevents any issues with the migration from affecting the serving of traffic by the main messenger service instances. - Redeploy the PostgreSQL database. Because you are using
bashscripts in this tutorial, you need to stop and restart the database service. In a production application, you typically just run aninfrastructure-as-code script instead, to add only the elements that have changed.
docker stop messenger-db-primaryCONSUL_HOST=consul-client CONSUL_PORT=8500 ./infrastructure/messenger-db-deploy.sh- Deploy the PostgreSQL database migrator service:
CONSUL_HOST=consul-client CONSUL_PORT=8500 ./infrastructure/messenger-db-migrator-deploy.sh- Verify that the instance is running as expected:
docker ps --format "{{.Names}}"
...
messenger-migrator- You can also verify in the Consul UI that the database migrator service has correctly registered itself with Consul as messenger-migrator (again, it doesn’t register under the messenger name because it doesn’t handle traffic):

- Now for the final step – run the database migration scripts! These scripts don’t resemble any real database migration scripts, but they do use the messenger-migrator service to run database‑specific scripts. Once the database has been migrated, stop the messenger-migrator service:
docker exec -i -e PGDATABASE=postgres -e CREATE_DB_NAME=messenger messenger-migrator node scripts/create-db.mjsdocker exec -i messenger-migrator node scripts/create-schema.mjs docker exec -i messenger-migrator node scripts/create-seed-data.mjs docker stop messenger-migratorTest the messenger Service in Action
Now that you have migrated the messenger database to its final format, the messenger service is finally ready for you to watch in action! To do this, you run some basic curl queries against the NGINX service (you configured NGINX as the system’s entry point in Set Up NGINX).
Some of the following commands use the jq library to format the JSON output. You can install it as necessary or omit it from the command line if you wish.
- Create a conversation:
curl -d '{"participant_ids": [1, 2]}' -H "Content-Type: application/json" -X POST 'http://localhost:8085/conversations'{
  "conversation": { "id": "1", "inserted_at": "YYYY-MM-DDT06:41:59.000Z" }
}- Send a message to the conversation from a user with ID 1:
curl -d '{"content": "This is the first message"}' -H "User-Id: 1" -H "Content-Type: application/json" -X POST 'http://localhost:8085/conversations/1/messages' | jq{
  "message": {
    "id": "1",
    "content": "This is the first message",
    "index": 1,
    "user_id": 1,
    "username": "James Blanderphone",
    "conversation_id": 1,
    "inserted_at": "YYYY-MM-DDT06:42:15.000Z"
  }
}- Reply with a message from a different user (with ID 2):
curl -d '{"content": "This is the second message"}' -H "User-Id: 2" -H "Content-Type: application/json" -X POST 'http://localhost:8085/conversations/1/messages' | jq{
  "message": {
    "id": "2",
    "content": "This is the second message",
    "index": 2,
    "user_id": 2,
    "username": "Normalavian Ropetoter",
    "conversation_id": 1,
    "inserted_at": "YYYY-MM-DDT06:42:25.000Z"
  }
}- Fetch the messages:
curl -X GET 'http://localhost:8085/conversations/1/messages' | jq{
  "messages": [
    {
      "id": "1",
      "content": "This is the first message",
      "user_id": "1",
      "channel_id": "1",
      "index": "1",
      "inserted_at": "YYYY-MM-DDT06:42:15.000Z",
      "username": "James Blanderphone"
    },
    {
      "id": "2",
      "content": "This is the second message",
      "user_id": "2",
      "channel_id": "1",
      "index": "2",
      "inserted_at": "YYYY-MM-DDT06:42:25.000Z",
      "username": "Normalavian Ropetoter"
    }
  ]
}
Clean Up
You have created a significant number of containers and images throughout this tutorial! Use the following commands to remove any Docker containers and images you don’t want to keep.
- To remove any running Docker containers:
docker rm $(docker stop $(docker ps -a -q --filter ancestor=messenger --format="{{.ID}}"))docker rm $(docker stop messenger-db-primary) docker rm $(docker stop messenger-lb)- To remove the platform services:
# From the platform repositorydocker compose down- To remove all Docker images used throughout the tutorial:
docker rmi messengerdocker rmi messenger-lb docker rmi postgres:15.1 docker rmi hashicorp/consul:1.14.4 docker rmi rabbitmq:3.11.4-management-alpineNext Steps
You might be thinking “This seems like a lot of work to set up something simple” – and you’d be right! Moving into a microservices‑focused architecture requires meticulousness around how you structure and configure services. Despite all the complexity, you made some solid progress:
- You set up a microservices‑focused configuration that is easily understandable by other teams.
- You set up the microservices system to be somewhat flexible both in terms of scaling and usage of the various services involved.
To continue your microservices education, check out Microservices March 2023. Unit 2, Microservices Secrets Management 101, provides an in‑depth but user‑friendly overview of secrets management in microservices environments.

About the Author
Related Blog Posts

Automating Certificate Management in a Kubernetes Environment
Simplify cert management by providing unique, automatically renewed and updated certificates to your endpoints.

Secure Your API Gateway with NGINX App Protect WAF
As monoliths move to microservices, applications are developed faster than ever. Speed is necessary to stay competitive and APIs sit at the front of these rapid modernization efforts. But the popularity of APIs for application modernization has significant implications for app security.
How Do I Choose? API Gateway vs. Ingress Controller vs. Service Mesh
When you need an API gateway in Kubernetes, how do you choose among API gateway vs. Ingress controller vs. service mesh? We guide you through the decision, with sample scenarios for north-south and east-west API traffic, plus use cases where an API gateway is the right tool.
Deploying NGINX as an API Gateway, Part 2: Protecting Backend Services
In the second post in our API gateway series, Liam shows you how to batten down the hatches on your API services. You can use rate limiting, access restrictions, request size limits, and request body validation to frustrate illegitimate or overly burdensome requests.
New Joomla Exploit CVE-2015-8562
Read about the new zero day exploit in Joomla and see the NGINX configuration for how to apply a fix in NGINX or NGINX Plus.
Why Do I See “Welcome to nginx!” on My Favorite Website?
The ‘Welcome to NGINX!’ page is presented when NGINX web server software is installed on a computer but has not finished configuring