
To enhance security and improve user experience, F5 NGINX Plus (R29+) now has support for Security Assertion Markup Language (SAML). A well-established protocol that provides single sign-on (SSO) to web applications, SAML enables an identity provider (IdP) to authenticate users for access to a resource and then passes that information to a service provider (SP) for authorization.
In this blog post, we cover step-by-step how to integrate NGINX with Microsoft Entra ID, formerly known as Azure Active Directory (Azure AD), using a web application that does not natively support SAML. We also cover how to implement SSO for the application and integrate it with the Microsoft Entra ID ecosystem. By following the tutorial, you’ll additionally learn how NGINX can extract claims from a SAML assertion (including UPN, first name, last name, and group memberships) and then pass them to the application via HTTP headers.
The tutorial includes three steps:
- Configuring Microsoft Entra ID as an IdP
- Configuring SAML settings and NGINX Plus as a reverse proxy
- Testing the configuration
To complete this tutorial, you need:
- NGINX Plus (R29+), which you can get as a free 30-day trial
- A free or enterprise Microsoft Entra ID account
- A valid SSL/TLS certificate installed on the NGINX Plus server (this tutorial uses
dev.sports.com.crt and dev.sports.com.key) - To verify the SAML assertions, which can be done by downloading the public certificate
demonginx.cerfrom the IdP
Note: This tutorial does not apply to NGINX Open Source deployments because the key-value store is exclusive to NGINX Plus.
Using NGINX Plus as a SAML Service Provider
In this setup, NGINX Plus acts as a SAML SP and can participate in an SSO implementation with a SAML IdP, which communicates indirectly with NGINX Plus via the User Agent.
The diagram below illustrates the SSO process flow, with SP initiation and POST bindings for request and response. It is critical to again note that this communication channel is not direct and is managed through the User Agent.

Figure 1: SAML SP-Initiated SSO with POST bindings for AuthnRequest and Response
Step 1: Configure Microsoft Entra ID as an Identity Provider
To access your Microsoft Entra ID management portal, sign in and navigate to the left-hand panel. Select Microsoft Entra ID and then click on the directory’s title that requires SSO configuration. Once selected, choose Enterprise applications.

Figure 2: Choosing Enterprise applications in the management portal
To create an application, click the New application button at the top of the portal. In this example, we created an application called demonginx.
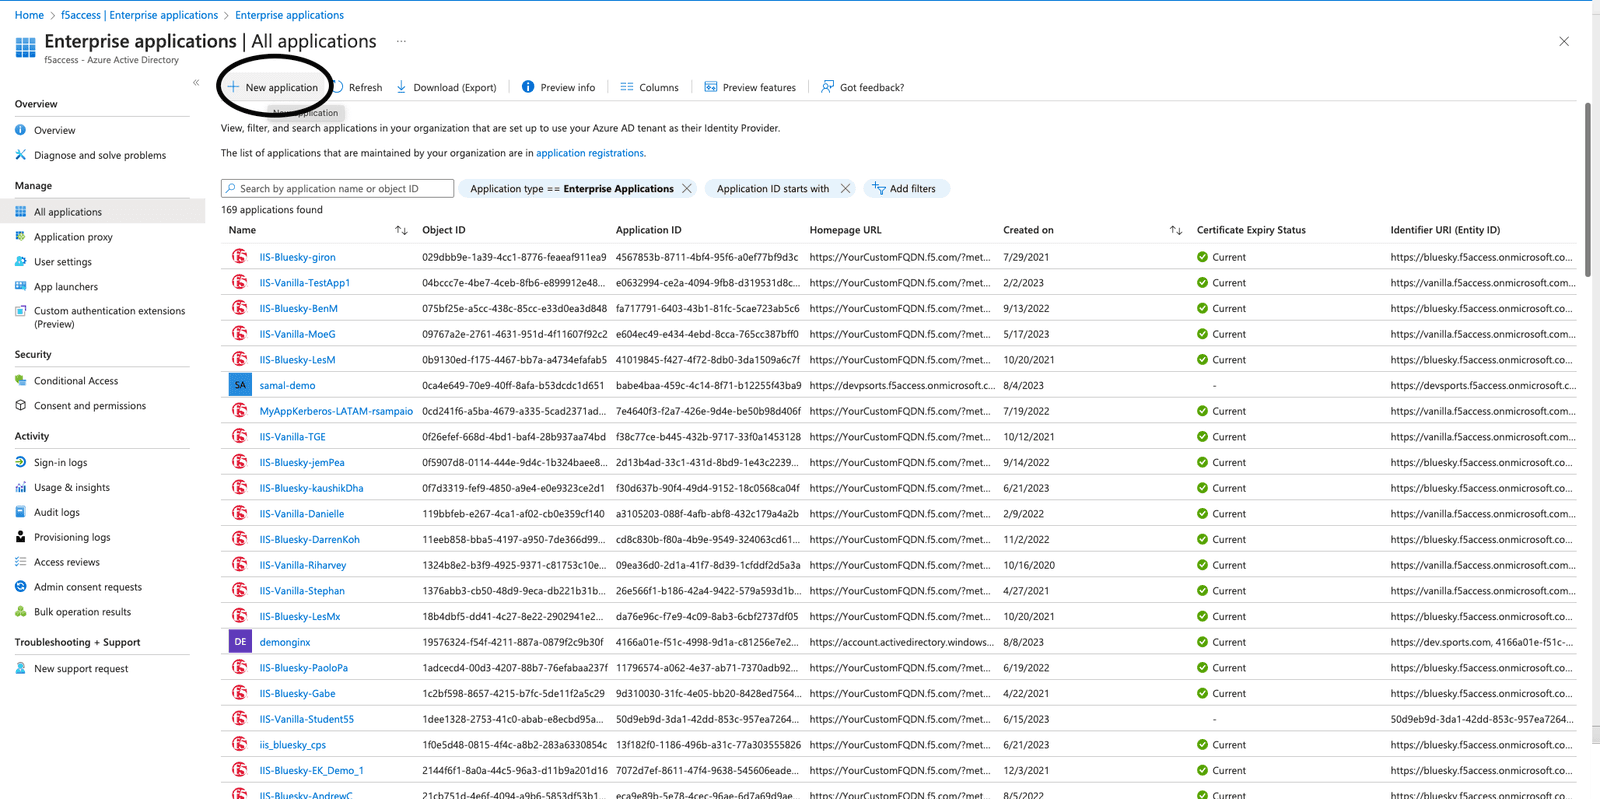
Figure 3: Creating a new application in Microsoft Entra ID
After you’re redirected to the newly created application Overview, go to Getting Started via the left menu and click Single sign-on under Manage. Then, select SAML as the single sign-on method.
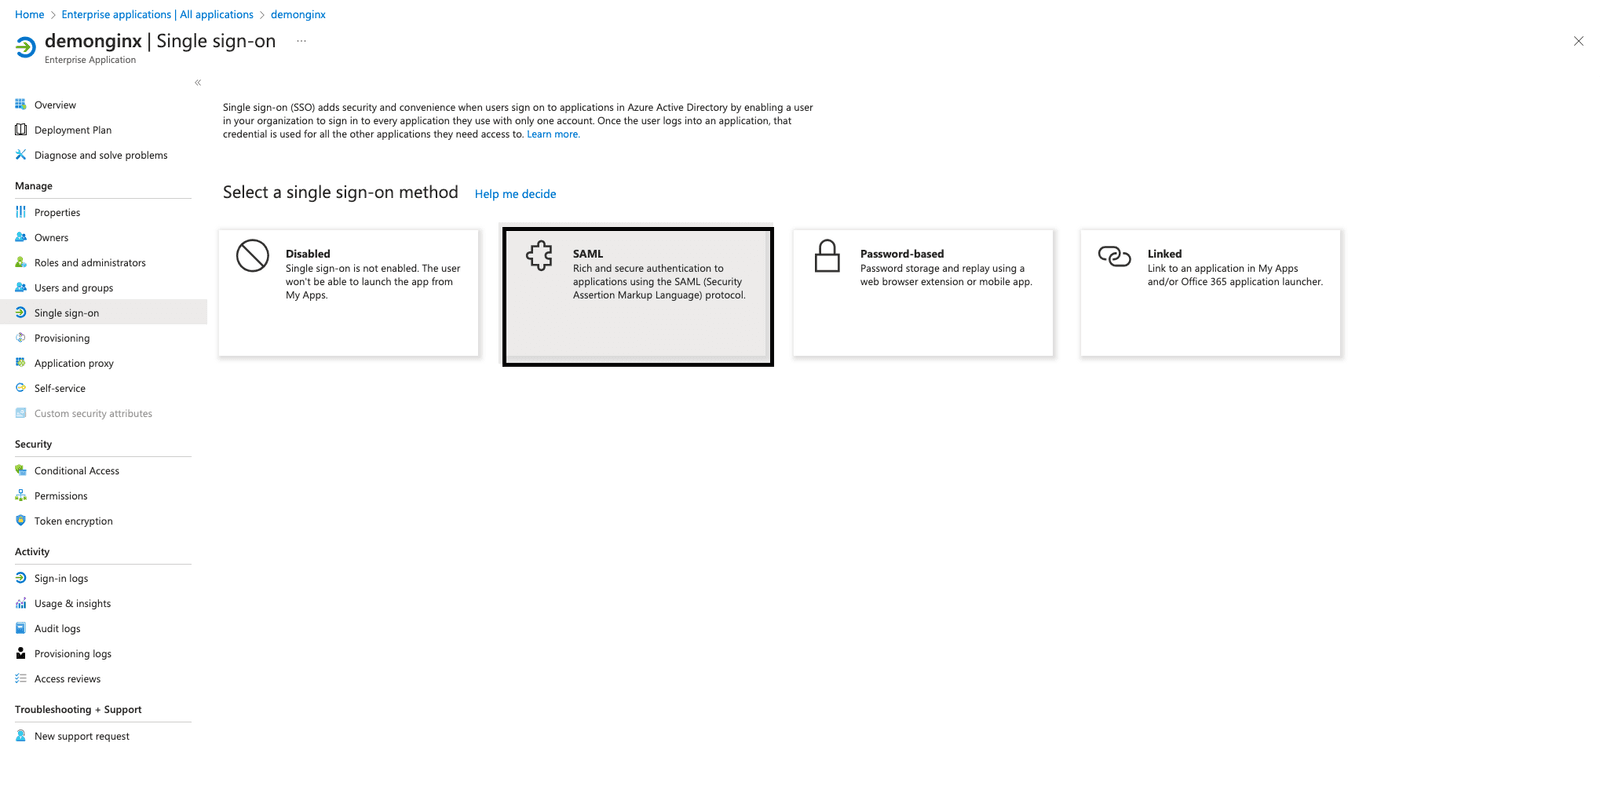
Figure 4: Using the SSO section to start the SAML configuration
To set up SSO in your enterprise application, you need to register NGINX Plus as an SP within Microsoft Entra ID. To do this, click the pencil icon next to Edit in Basic SAML Configuration, as seen Figure 5.
Add the following values then click Save:
- Identifier (Entity ID) – https://dev.sports.com
- Reply URL (Assertion Consumer Service URL) – https://dev.sports.com/saml/acs
- Sign on URL: https://dev.sports.com
- Logout URL (Optional): https://dev.sports.com/saml/sls
The use of verification certificates is optional. When enabling this setting, two configuration options in NGINX must be addressed:
- To verify the signature with a public key, you need to set
$saml_sp_sign_authnto true. This instructs the SP to sign the AuthnRequest sent to the IdP. - Provide the path to the private key that will be used for this signature by configuring the
$saml_sp_signing_key. Make sure to upload the corresponding public key certificate to Microsoft Entra ID for signature verification.
Note: In this demo, attributes and claims have been modified, and new SAML attributes are added. These SAML attributes are sent by the IdP. Ensure that your NGINX configuration is set up to properly receive and process these attributes. You can check and adjust related settings in the NGINX GitHub repo.
Download the IdP Certificate (Raw) from Microsoft Entra ID and save it to your NGINX Plus instance.
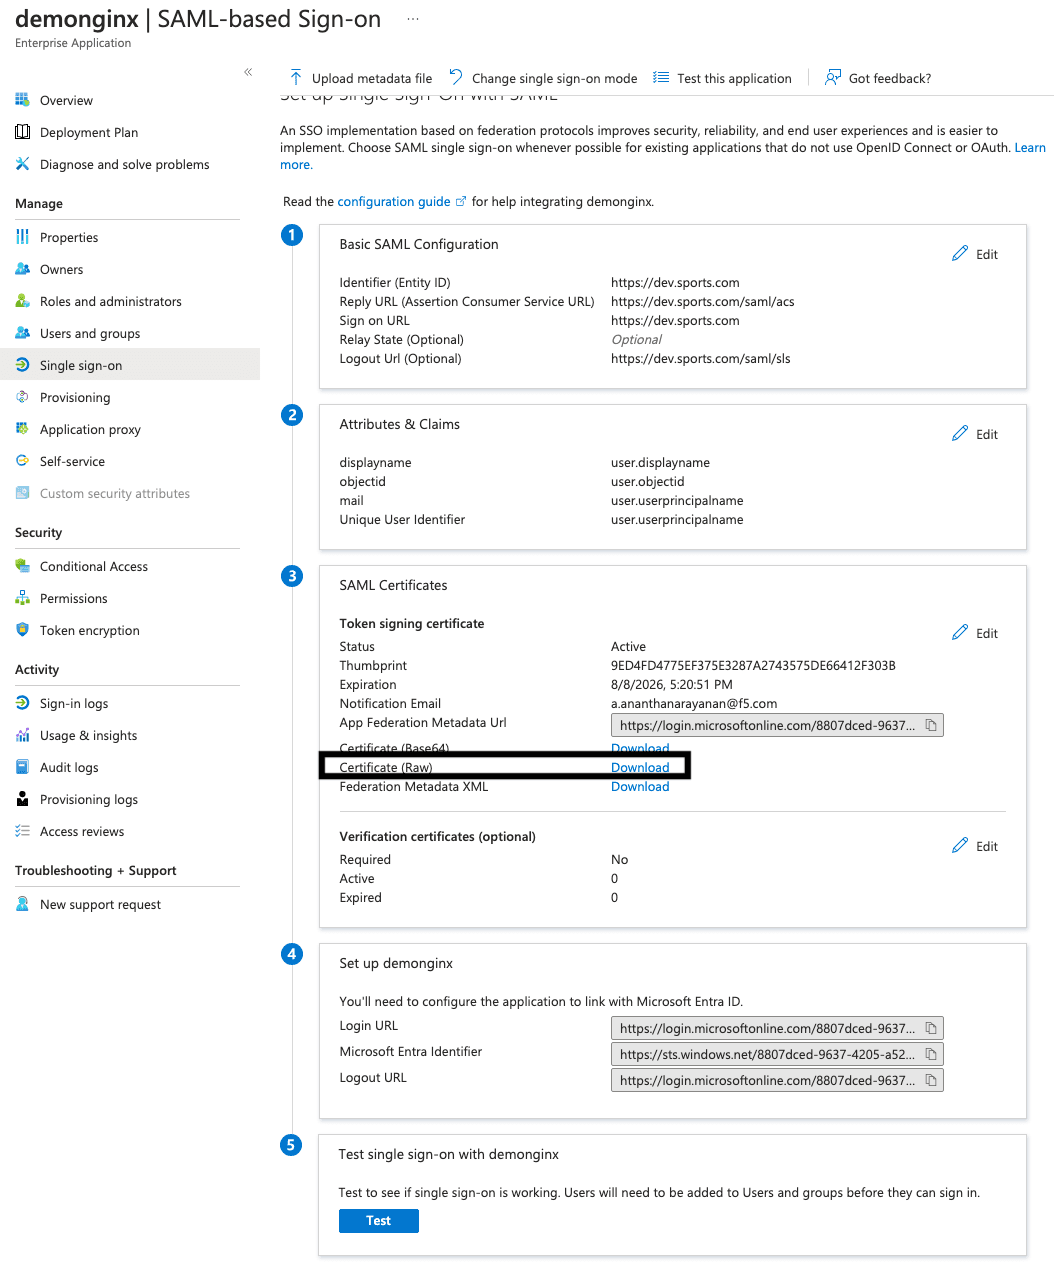
Figure 5: Downloading the IdP Certificate (Raw) from Microsoft Entra ID
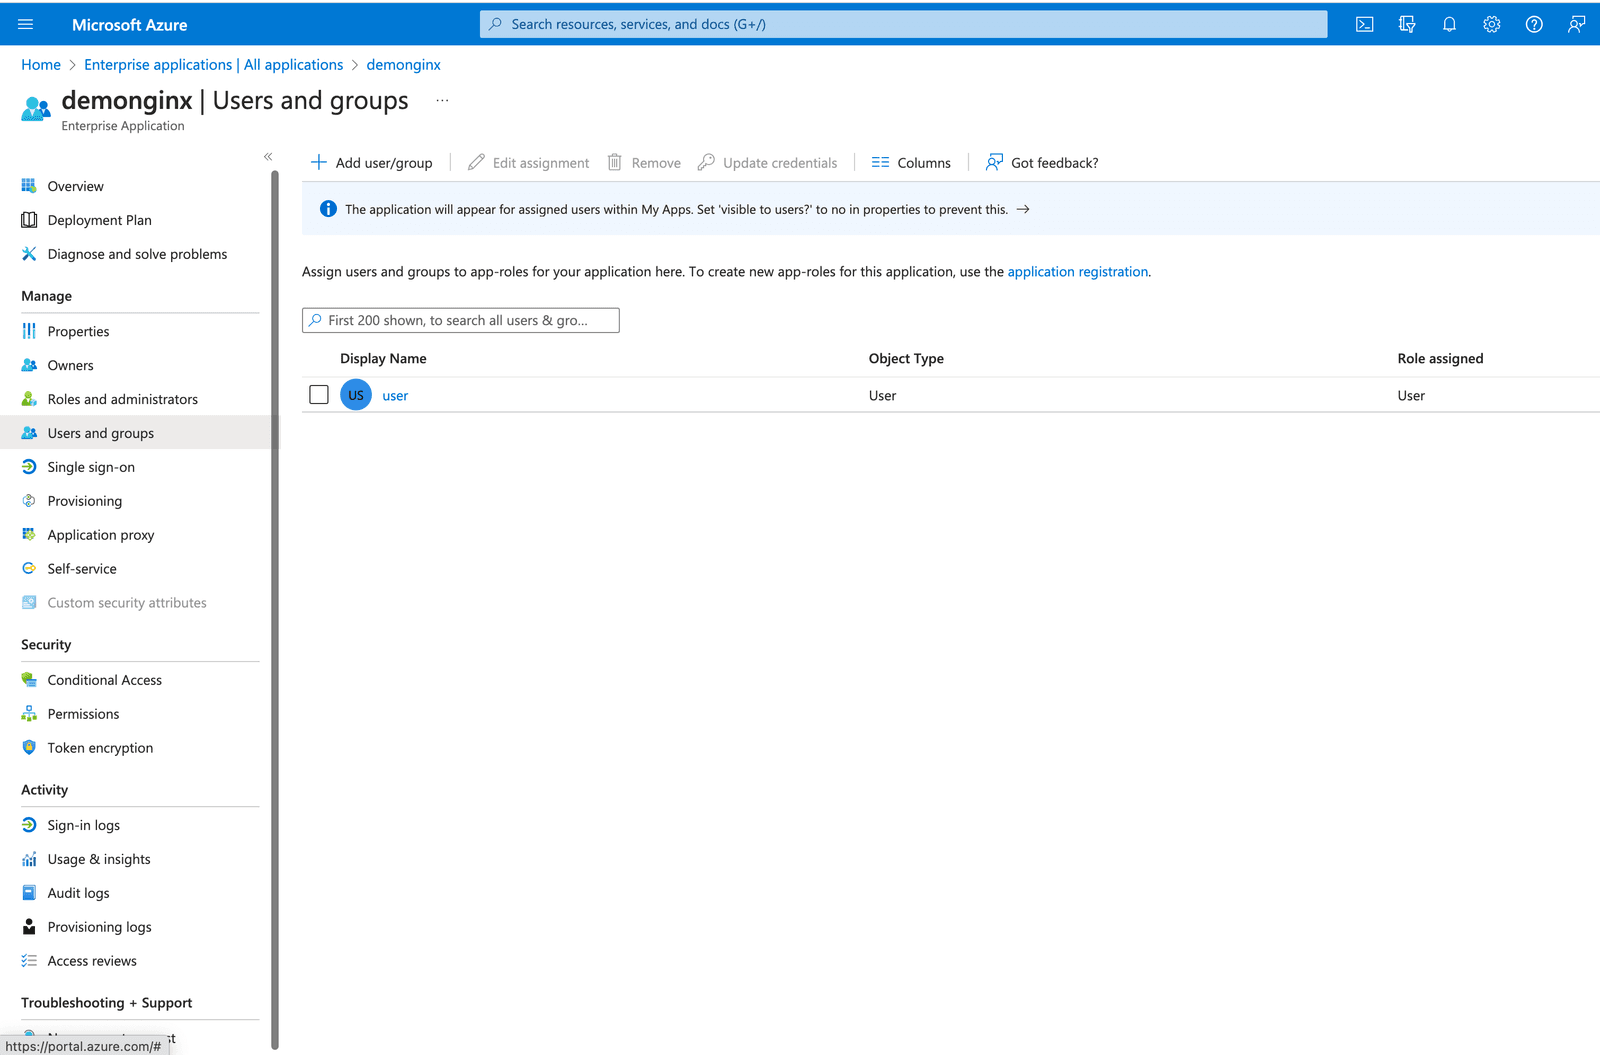
Figure 6: Adding a new user or group
In Microsoft Entra ID, you can grant access to your SSO-enabled company applications by adding or assigning users and groups.
On the left-hand menu, click User and groups and then the top button Add user/group.
Step 2: Configure SAML Settings and NGINX Plus as a Reverse Proxy
Ensure you have the necessary certificates before configuring files in your NGINX Plus SP:
- Certificates for terminating TLS session (
dev.sports.com.crt and dev.sports.com.key) - Certificate downloaded from Microsoft Entra ID for IdP signing verification (
demonginx.cer)
Note: The certificates need to be in SPKI format.
To begin this step, download the IdP certificate from Microsoft Entra ID for signing verification. Then, convert PEM to DER format:
openssl x509 -in demonginx.cer -outform DER -out demonginx.der
In case you want to verify SAML SP assertions, it’s recommended to use public/private keys that are different from the ones used for TLS termination.
Extract the public key certificate in SPKI format:
openssl x509 -inform DER -in demonginx.der -pubkey -noout > demonginx.spki
Edit the frontend.conf file to update these items:
ssl_certificate– Update to include the TLS certificate path.ssl_certificate_key– Update to include the TLS private key path.
In production deployment, you can use different backend destinations based on the business requirement. In this example, the backend provides a customized response:
“Welcome to Application pagen My objectid is $http_objectidn My email is $http_mailn”;
We have modified the attributes and claims in Microsoft Entra ID by adding new claims for the user’s mail and objectid. These updates enable you to provide a more personalized and tailored response to your application, resulting in an improved user experience.
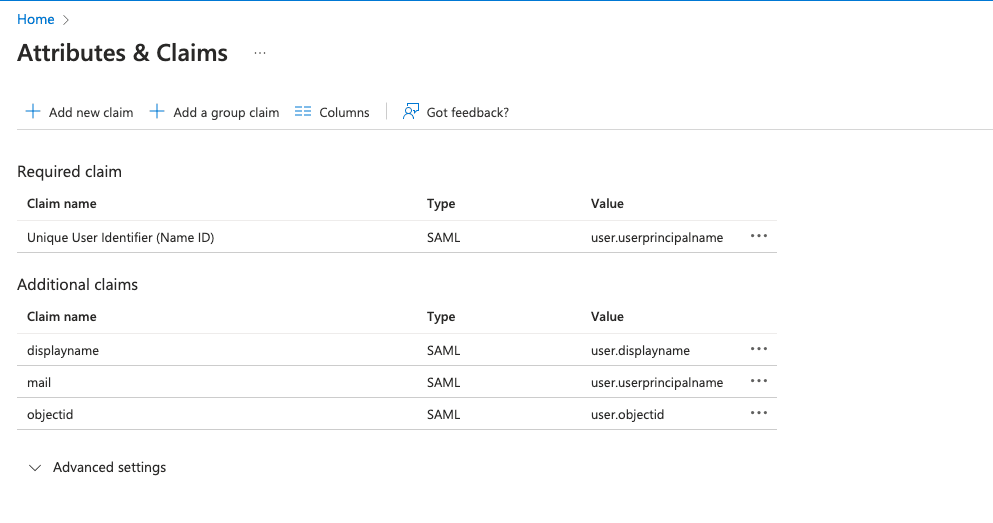
Figure 7: Modified attributes and claims in Microsoft Entra ID
The next step is to configure NGINX, which will proxy traffic to the backend application. In this demo, the backend SAML application is publicly available at https://dev.sports.com.
Edit your frontend.conf file:
# This is file frontend.conf
# This is the backend application we are protecting with SAML SSO
upstream my_backend {
    zone my_backend 64k;
    server dev.sports.com;
}

# Custom log format to include the 'NameID' subject in the REMOTE_USER field
log_format saml_sso '$remote_addr - $saml_name_id [$time_local] "$request" "$host" '
                    '$status $body_bytes_sent "$http_referer" '
                    '"$http_user_agent" "$http_x_forwarded_for"';

# The frontend server - reverse proxy with SAML SSO authentication
#
server {
    # Functional locations implementing SAML SSO support
    include conf.d/saml_sp.server_conf;


    # Reduce severity level as required
    error_log /var/log/nginx/error.log debug;
    listen 443 ssl;
    ssl_certificate     /home/ubuntu/dev.sports.com.crt;
    ssl_certificate_key  /home/ubuntu/dev.sports.com.key;
    ssl_session_cache shared:SSL:5m;


    location / {
        # When a user is not authenticated (i.e., the "saml_access_granted."
        # variable is not set to "1"), an HTTP 401 Unauthorized error is
        # returned, which is handled by the @do_samlsp_flow named location.
        error_page 401 = @do_samlsp_flow;

        if ($saml_access_granted != "1") {
            return 401;
        }

        # Successfully authenticated users are proxied to the backend,
        # with the NameID attribute passed as an HTTP header
        proxy_set_header mail $saml_attrib_mail;  # Microsoft Entra ID's user.mail
        proxy_set_header objectid $saml_attrib_objectid; # Microsoft Entra ID's objectid
        access_log /var/log/nginx/access.log saml_sso;
        proxy_pass http://my_backend;
        proxy_set_header Host dev.sports.com;
        return 200 "Welcome to Application pagen My objectid is $http_objectidn My email is $http_mailn";
        default_type text/plain;

   }
}
# vim: syntax=nginx
For the attributes saml_attrib_mail and saml_attrib_ objectid to reflect in NGINX configurations, update the key-value store part of saml_sp_configuration.conf as follows:
keyval_zone    zone=saml_attrib_mail:1M                state=/var/lib/nginx/state/saml_attrib_email.json   timeout=1h;
keyval   $cookie_auth_token $saml_attrib_mail    zone=saml_attrib_mail;

 keyval_zone zone=saml_attrib_objectid:1M            state=/var/lib/nginx/state/saml_attrib_objectid.json   timeout=1h;
keyval   $cookie_auth_token $saml_attrib_objectid   zone=saml_attrib_objectid;
Next, configure the SAML SSO configuration file. This file contains the primary configurations for the SP and IdP. To customize it according to your specific SP and IdP setup, you need to adjust the multiple map{} blocks included in the file.
This table provides descriptions of the variables within saml_sp_configuration.conf:
| Variable | Description |
|---|---|
saml_sp_entity_id | The URL used by the users to access the application. |
saml_sp_acs_url | The URL used by the service provider to receive and process the SAML response, extract the user’s identity, and then grant or deny access to the requested resource based on the provided information. |
saml_sp_sign_authn | Specifies if the SAML request from SP to IdP should be signed or not. The signature is done using the SP signing key and you need to upload the associated certificate to the IdP to verify the signature. |
saml_sp_signing_key | The signing key that is used to sign the SAML request from SP to IdP. Make sure to upload the associated certificate to the IdP to verify the signature. |
saml_idp_entity_id | The identity that is used to define the IdP. |
saml_idp_sso_url | The IdP endpoint to which the SP sends the SAML assertion request to initiate the authentication request. |
saml_idp_verification_certificate | The certification used to verify signed SAML assertions received from the IdP. The certificate is provided by the IdP and needs to be in SPKI format. |
saml_sp_slo_url | The SP endpoint that the IdP sends the SAML LogoutRequest to (when initiating a logout process) or the LogoutResponse to (when confirming the logout). |
saml_sp_sign_slo | Specifies if the logout SAML is to be signed by the SP or not. |
saml_idp_slo_url | The IdP endpoint that the SP sends the LogoutRequest to (when initiating a logout process) or LogoutResponse to (when confirming the logout). |
saml_sp_want_signed_slo | Specifies if the SAML SP wants the SAML logout response or request from the IdP to be signed or not. |
The code below shows the edited values only for this use case at saml_sp_configuration.conf.
Note: Make sure the remaining parts of the configuration file still appear in the file (e.g., the key-value stores). Also ensure that you properly adjust the variables within the saml_sp_configuration.conf file based on your deployment.
 # SAML SSO configuration

map $host $saml_sp_entity_id {
    # Unique identifier that identifies the SP to the IdP.
    # Must be URL or URN.
    default "https://dev.sports.com";
}

map $host $saml_sp_acs_url {
    # The ACS URL, an endpoint on the SP where the IdP
    # will redirect to with its authentication response.
    # Must match the ACS location defined in the "saml_sp.serer_conf" file.
    default "https://dev.sports.com/saml/acs";
}

map $host $saml_sp_request_binding {
    # Refers to the method by which an authentication request is sent from
    # the SP to an IdP during the Single Sign-On (SSO) process.
    # Only HTTP-POST or HTTP-Redirect methods are allowed.
    default 'HTTP-POST';
}

map $host $saml_sp_sign_authn {
    # Whether the SP should sign the AuthnRequest sent to the IdP.
    default "false";
}

map $host $saml_sp_decryption_key {
    # Specifies the private key that the SP uses to decrypt encrypted assertion
    # or NameID from the IdP.
    default "";
}

map $host $saml_sp_force_authn {
    # Whether the SP should force re-authentication of the user by the IdP.
    default "false";
}

map $host $saml_sp_nameid_format {
    # Indicates the desired format of the name identifier in the SAML assertion
    # generated by the IdP. Check section 8.3 of the SAML 2.0 Core specification
    # (http://docs.oasis-open.org/security/saml/v2.0/saml-core-2.0-os.pdf)
    # for the list of allowed NameID Formats.
    default "urn:oasis:names:tc:SAML:1.1:nameid-format:unspecified";
}

map $host $saml_sp_relay_state {
    # Relative or absolute URL the SP should redirect to
    # after successful sign on.
    default "";
}

map $host $saml_sp_want_signed_response {
    # Whether the SP wants the SAML Response from the IdP
    # to be digitally signed.
    default "false";
}

map $host $saml_sp_want_signed_assertion {
    # Whether the SP wants the SAML Assertion from the IdP
    # to be digitally signed.
    default "true";
}

map $host $saml_sp_want_encrypted_assertion {
    # Whether the SP wants the SAML Assertion from the IdP
    # to be encrypted.
    default "false";
}

map $host $saml_idp_entity_id {
    # Unique identifier that identifies the IdP to the SP.
    # Must be URL or URN.
    default "https://sts.windows.net/8807dced-9637-4205-a520-423077750c60/";
}

map $host $saml_idp_sso_url {
    # IdP endpoint that the SP will send the SAML AuthnRequest to initiate
    # an authentication process.
    default "https://login.microsoftonline.com/8807dced-9637-4205-a520-423077750c60/saml2";
}

map $host $saml_idp_verification_certificate {
    # Certificate file that will be used to verify the digital signature
    # on the SAML Response, LogoutRequest or LogoutResponse received from IdP.
    # Must be public key in PKCS#1 format. See documentation on how to convert
    # X.509 PEM to DER format.
    default "/etc/nginx/conf.d/demonginx.spki";
}

######### Single Logout (SLO) #########

map $host $saml_sp_slo_url {
    # SP endpoint that the IdP will send the SAML LogoutRequest to initiate
    # a logout process or LogoutResponse to confirm the logout.
    default "https://dev.sports.com/saml/sls";
}

map $host $saml_sp_slo_binding {
    # Refers to the method by which a LogoutRequest or LogoutResponse
    # is sent from the SP to an IdP during the Single Logout (SLO) process.
    # Only HTTP-POST or HTTP-Redirect methods are allowed.
    default 'HTTP-POST';
}

map $host $saml_sp_sign_slo {
    # Whether the SP must sign the LogoutRequest or LogoutResponse
    # sent to the IdP.
    default "false";
}

map $host $saml_idp_slo_url {
    # IdP endpoint that the SP will send the LogoutRequest to initiate
    # a logout process or LogoutResponse to confirm the logout.
    # If not set, the SAML Single Logout (SLO) feature is DISABLED and
    # requests to the 'logout' location will result in the termination
    # of the user session and a redirect to the logout landing page.
    default "https://login.microsoftonline.com/8807dced-9637-4205-a520-423077750c60/saml2";
}

map $host $saml_sp_want_signed_slo {
    # Whether the SP wants the SAML LogoutRequest or LogoutResponse from the IdP
    # to be digitally signed.
    default "true";
}

map $host $saml_logout_landing_page {
    # Where to redirect user after requesting /logout location. This can be
    # replaced with a custom logout page, or complete URL.
    default "/_logout"; # Built-in, simple logout page
}

map $proto $saml_cookie_flags {
    http  "Path=/; SameSite=lax;"; # For HTTP/plaintext testing
    https "Path=/; SameSite=lax; HttpOnly; Secure;"; # Production recommendation
}

map $http_x_forwarded_port $redirect_base {
    ""      $proto://$host:$server_port;
    default $proto://$host:$http_x_forwarded_port;
}

map $http_x_forwarded_proto $proto {
    ""      $scheme;
    default $http_x_forwarded_proto;
}
# ADVANCED CONFIGURATION BELOW THIS LINE
# Additional advanced configuration (server context) in saml_sp.server_conf

######### Shared memory zones that keep the SAML-related key-value databases

# Zone for storing AuthnRequest and LogoutRequest message identifiers (ID)
# to prevent replay attacks. (REQUIRED)
# Timeout determines how long the SP waits for a response from the IDP,
# i.e. how long the user authentication process can take.
keyval_zone zone=saml_request_id:1M                 state=/var/lib/nginx/state/saml_request_id.json                  timeout=5m;

# Zone for storing SAML Response message identifiers (ID) to prevent replay attacks. (REQUIRED)
# Timeout determines how long the SP keeps IDs to prevent reuse.
keyval_zone zone=saml_response_id:1M                state=/var/lib/nginx/state/saml_response_id.json                 timeout=1h;

# Zone for storing SAML session access information. (REQUIRED)
# Timeout determines how long the SP keeps session access decision (the session lifetime).
keyval_zone zone=saml_session_access:1M             state=/var/lib/nginx/state/saml_session_access.json              timeout=1h;

# Zone for storing SAML NameID values. (REQUIRED)
# Timeout determines how long the SP keeps NameID values. Must be equal to session lifetime.
keyval_zone zone=saml_name_id:1M                    state=/var/lib/nginx/state/saml_name_id.json                     timeout=1h;

# Zone for storing SAML NameID format values. (REQUIRED)
# Timeout determines how long the SP keeps NameID format values. Must be equal to session lifetime.
keyval_zone zone=saml_name_id_format:1M             state=/var/lib/nginx/state/saml_name_id_format.json              timeout=1h;

# Zone for storing SAML SessionIndex values. (REQUIRED)
# Timeout determines how long the SP keeps SessionIndex values. Must be equal to session lifetime.
keyval_zone zone=saml_session_index:1M              state=/var/lib/nginx/state/saml_session_index.json               timeout=1h;

# Zone for storing SAML AuthnContextClassRef values. (REQUIRED)
# Timeout determines how long the SP keeps AuthnContextClassRef values. Must be equal to session lifetime.
keyval_zone zone=saml_authn_context_class_ref:1M    state=/var/lib/nginx/state/saml_authn_context_class_ref.json     timeout=1h;

# Zones for storing SAML attributes values. (OPTIONAL)
# Timeout determines how long the SP keeps attributes values. Must be equal to session lifetime.
keyval_zone zone=saml_attrib_uid:1M                 state=/var/lib/nginx/state/saml_attrib_uid.json                  timeout=1h;
keyval_zone zone=saml_attrib_name:1M                state=/var/lib/nginx/state/saml_attrib_name.json                 timeout=1h;
keyval_zone zone=saml_attrib_memberOf:1M            state=/var/lib/nginx/state/saml_attrib_memberOf.json             timeout=1h;

######### SAML-related variables whose value is looked up by the key (session cookie) in the key-value database.

# Required:
keyval $saml_request_id     $saml_request_redeemed          zone=saml_request_id;               # SAML Request ID
keyval $saml_response_id    $saml_response_redeemed         zone=saml_response_id;              # SAML Response ID
keyval $cookie_auth_token   $saml_access_granted            zone=saml_session_access;           # SAML Access decision
keyval $cookie_auth_token   $saml_name_id                   zone=saml_name_id;                  # SAML NameID
keyval $cookie_auth_token   $saml_name_id_format            zone=saml_name_id_format;           # SAML NameIDFormat
keyval $cookie_auth_token   $saml_session_index             zone=saml_session_index;            # SAML SessionIndex
keyval $cookie_auth_token   $saml_authn_context_class_ref   zone=saml_authn_context_class_ref;  # SAML AuthnContextClassRef

# Optional:
keyval $cookie_auth_token   $saml_attrib_uid                zone=saml_attrib_uid;
keyval $cookie_auth_token   $saml_attrib_name               zone=saml_attrib_name;
keyval $cookie_auth_token   $saml_attrib_memberOf           zone=saml_attrib_memberOf;


keyval_zone    zone=saml_attrib_mail:1M                state=/var/lib/nginx/state/saml_attrib_mail.json   timeout=1h;
keyval         $cookie_auth_token $saml_attrib_mail    zone=saml_attrib_mail;

keyval $cookie_auth_token   $saml_attrib_objectid           zone=saml_attrib_objectid;
keyval_zone zone=saml_attrib_objectid:1M            state=/var/lib/nginx/state/saml_attrib_objectid.json             timeout=1h;


######### Imports a module that implements SAML SSO and SLO functionality
js_import samlsp from conf.d/saml_sp.js;
Step 3: Testing the Configuration
Two parts are required to test the configuration:
- Verifying the SAML flow
- Testing the SP-initiated logout functionality
Verifying the SAML Flow
After configuring the SAML SP using NGINX Plus and the IdP using Microsoft Entra ID, it is crucial to validate the SAML flow. This validation process ensures that user authentication through the IdP is successful and that access to SP-protected resources is granted.
To verify the SP-initiated SAML flow, open your preferred browser and type https://dev.sports.com in the address bar. This directs you to the IdP login page.
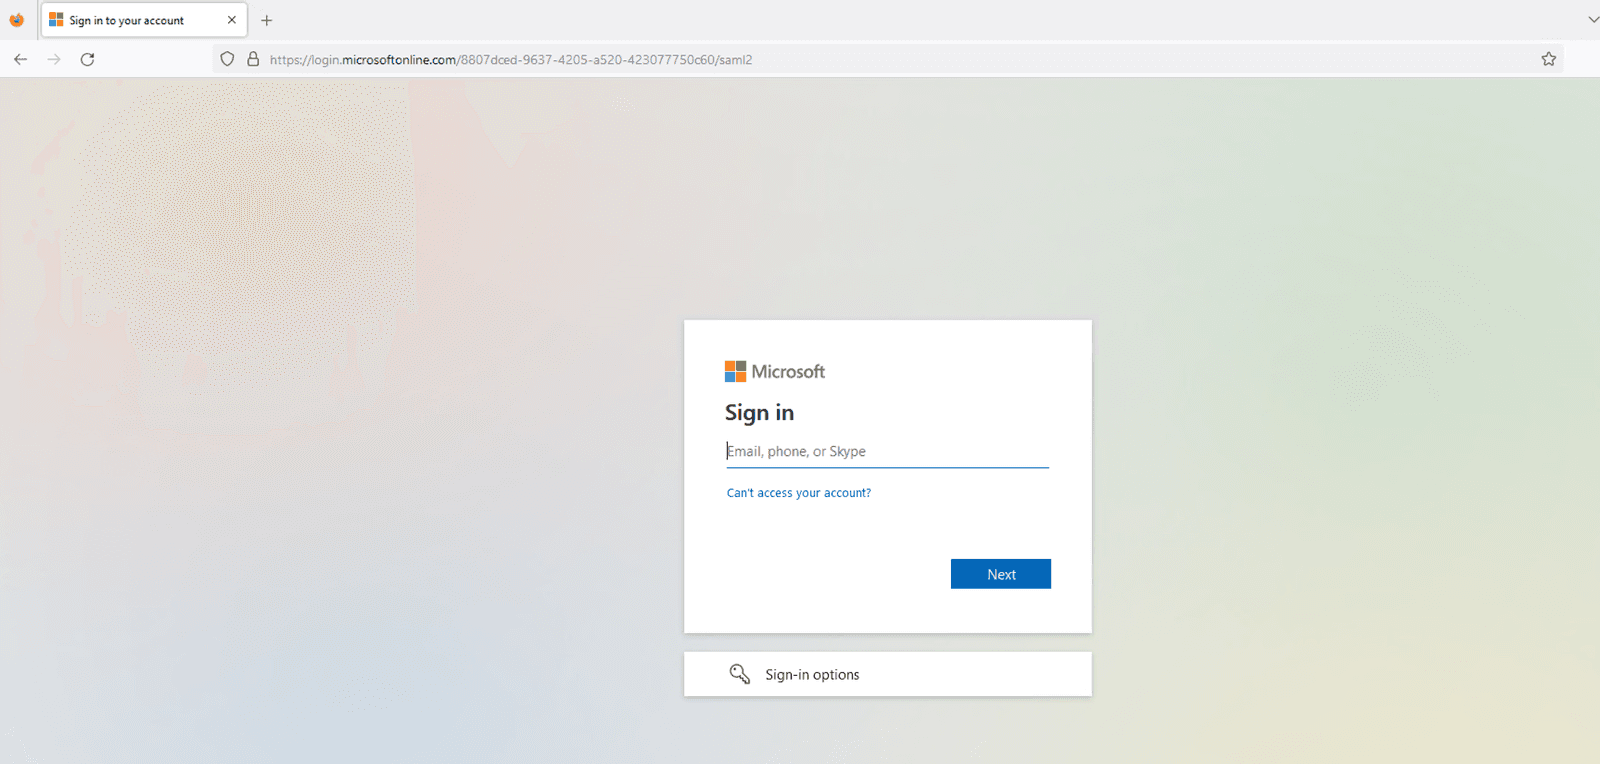
Figure 8: The IdP login page
Enter the credentials of a user who is configured in the IdP’s login page. The IdP will authenticate the user upon submitting.

Figure 9: Entering the configured user’s credentials
The user will be granted access to the previously requested protected resource upon successfully establishing a session. Subsequently, that resource will be displayed in the user’s browser.
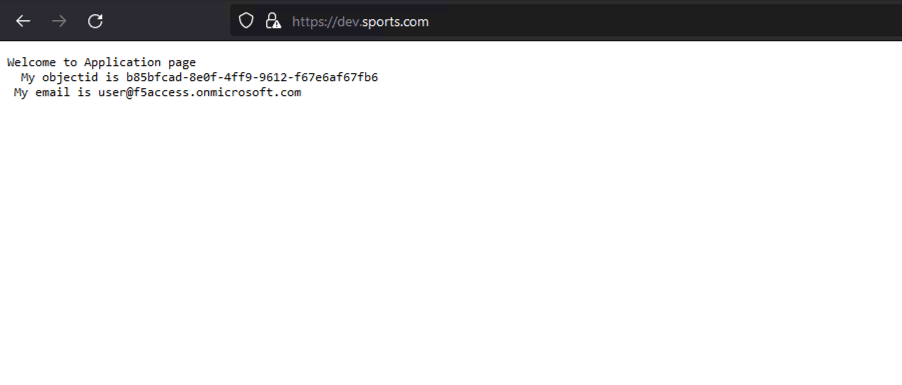
Figure 10: The successfully loaded application page
Valuable information about the SAML flow can be obtained by checking the SP and IdP logs. On the SP side (NGINX Plus), ensure the auth_token cookies are set correctly. On the IdP side (Microsoft Entra ID), ensure that the authentication process completes without errors and that the SAML assertion is sent to the SP.
The NGINX access.log should look like this:
127.0.0.1 - - [14/Aug/2023:21:25:49 +0000] "GET / HTTP/1.0" 200 127 "https://login.microsoftonline.com/" "Mozilla/5.0 (Macintosh; Intel Mac OS X 10_15_7) AppleWebKit/605.1.15 (KHTML, like Gecko) Version/16.1 Safari/605.1.15" "-"

99.187.244.63 - Akash Ananthanarayanan [14/Aug/2023:21:25:49 +0000] "GET / HTTP/1.1" "dev.sports.com" 200 127 "https://login.microsoftonline.com/" "Mozilla/5.0 (Macintosh; Intel Mac OS X 10_15_7) AppleWebKit/605.1.15 (KHTML, like Gecko) Version/16.1 Safari/605.1.15" "-
While the NGINX debug.log looks like this:
2023/08/14 21:25:49 [info] 27513#27513: *399 js: SAML SP success, creating session _d4db9b93c415ee7b4e057a4bb195df6cd0be7e4d
Testing the SP-initiated Logout Functionality
SAML Single Logout (SLO) lets users log out of all involved IdPs and SPs with one action. NGINX Plus supports SP-initiated and IdP-initiated logout scenarios, enhancing security and user experience in SSO environments. In this example, we use an SP-initiated logout scenario.

Figure 11: SAML SP-Initiated SLO with POST/redirect bindings for LogoutRequest and LogoutResponse
After authenticating your session, log out by accessing the logout URL configured in your SP. For example, if you have set up https://dev.sports.com/logout as the logout URL in NGINX Plus, enter that URL in your browser’s address bar.
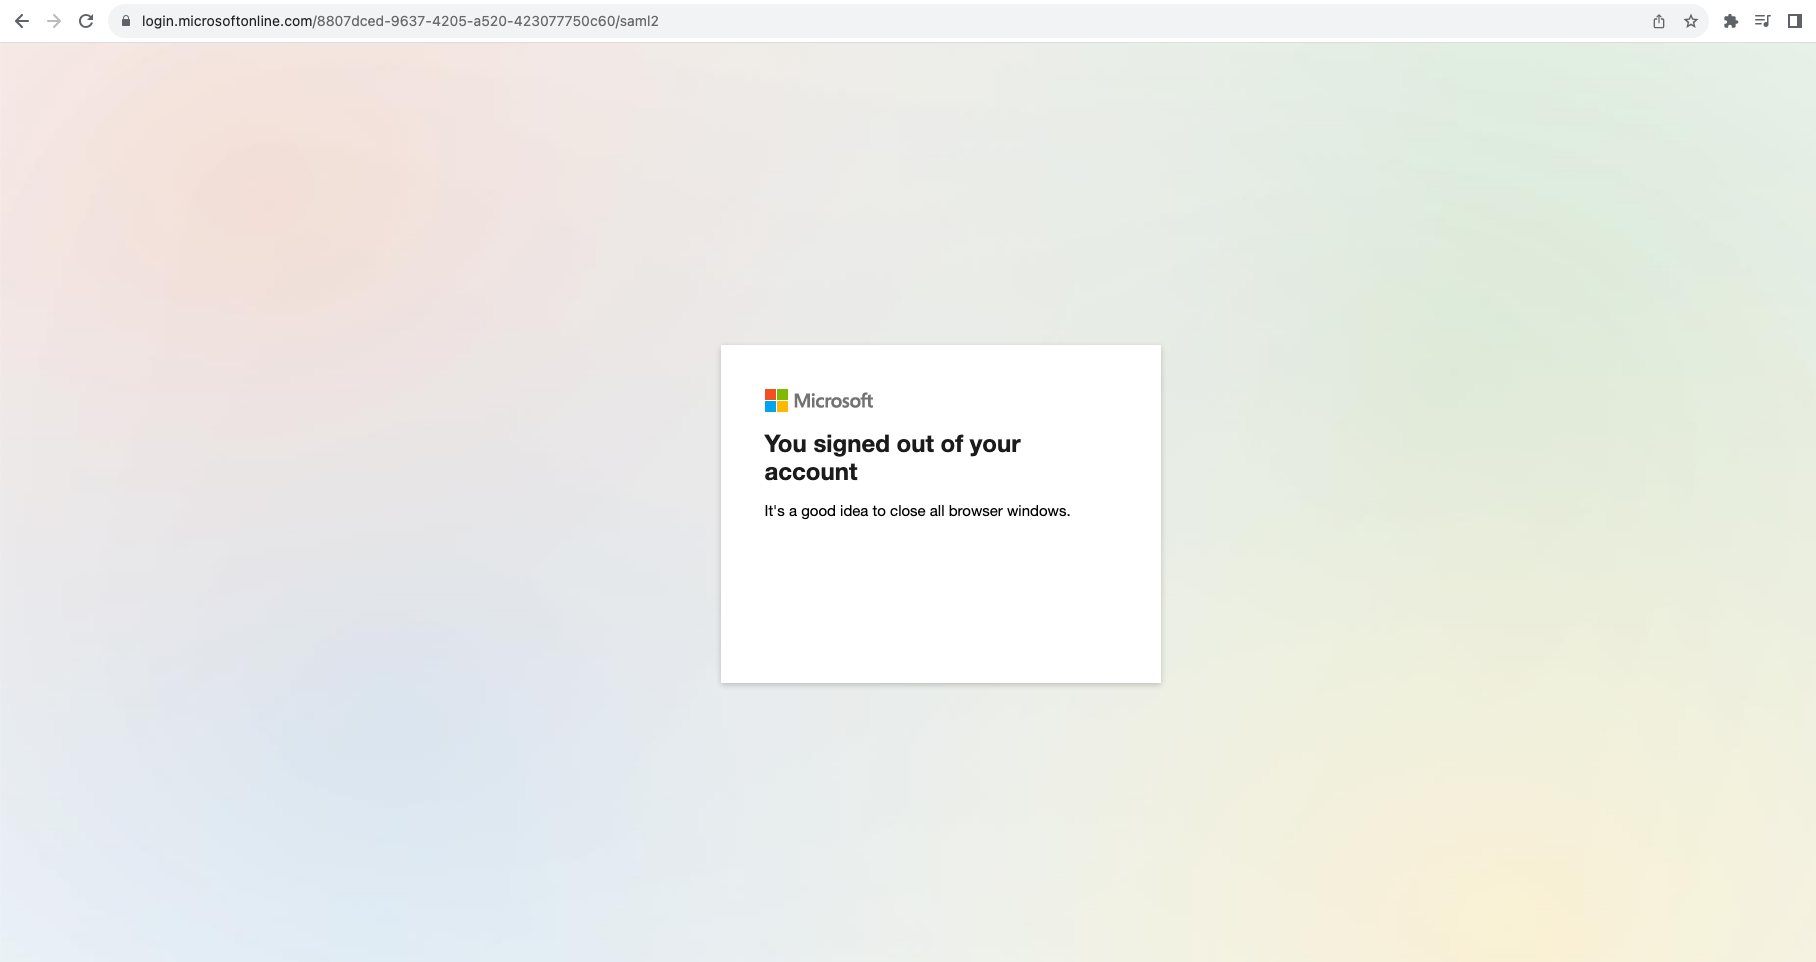
Figure 12: Successfully logging out of the session
To ensure a secure logout, the SP must initiate a SAML request that is then verified and processed by the IdP. This action effectively terminates the user’s session, and the IdP will then send a SAML response to redirect the user’s browser back to the SP.
Conclusion
Congratulations! NGINX Plus can now serve as a SAML SP, providing another layer of security and convenience to the authentication process. This new capability is a significant step forward for NGINX Plus, making it a more robust and versatile solution for organizations prioritizing security and efficiency.
Learn More About Using SAML with NGINX Plus
You can begin using SAML with NGINX Plus today by starting a 30-day free trial of NGINX Plus. We hope you find it useful and welcome your feedback.
More information about NGINX Plus with SAML is available in the resources below.
About the Author

Related Blog Posts

Automating Certificate Management in a Kubernetes Environment
Simplify cert management by providing unique, automatically renewed and updated certificates to your endpoints.

Secure Your API Gateway with NGINX App Protect WAF
As monoliths move to microservices, applications are developed faster than ever. Speed is necessary to stay competitive and APIs sit at the front of these rapid modernization efforts. But the popularity of APIs for application modernization has significant implications for app security.
How Do I Choose? API Gateway vs. Ingress Controller vs. Service Mesh
When you need an API gateway in Kubernetes, how do you choose among API gateway vs. Ingress controller vs. service mesh? We guide you through the decision, with sample scenarios for north-south and east-west API traffic, plus use cases where an API gateway is the right tool.
Deploying NGINX as an API Gateway, Part 2: Protecting Backend Services
In the second post in our API gateway series, Liam shows you how to batten down the hatches on your API services. You can use rate limiting, access restrictions, request size limits, and request body validation to frustrate illegitimate or overly burdensome requests.
New Joomla Exploit CVE-2015-8562
Read about the new zero day exploit in Joomla and see the NGINX configuration for how to apply a fix in NGINX or NGINX Plus.
Why Do I See “Welcome to nginx!” on My Favorite Website?
The ‘Welcome to NGINX!’ page is presented when NGINX web server software is installed on a computer but has not finished configuring