The ultimate goal of application development is, of course, to expose apps on the Internet. For a developer, Kubernetes simplifies this process to a degree by providing the Ingress controller as the mechanism for routing requests to the application. But not everything is as self‑service as you probably would like: you still need a record in the Domain Name System (DNS) to map the domain name for the app to the Ingress controller’s IP address and a TLS certificate to secure connections using HTTPS. In most organizations, you don’t own DNS or TLS yourself and so have to coordinate with the operational group (or groups!) that do.
Things aren’t necessarily any easier for operators. In most organizations the need to update DNS records is rare enough that procedures – both business rules and the actual technical steps – tend to be sparse or non‑existent. This means that when you need to add a DNS record you first need to find the documentation, ask a colleague, or (in a worst case) figure it out. You also need to ensure you’re in compliance with any corporate security rules and make sure that the ingress is tagged properly for the firewalls.
Fortunately, there is a way to make life easier for both developers and operators. In this post, we show how operators can configure a Kubernetes deployment to enable self‑service for developers to update DNS records and generate TLS certificates in a Kubernetes environment. By building out the infrastructure ahead of time, you can assure that all necessary business and technical requirements are being satisfied.
Overview and Prerequisites
With the solution in place, all a developer needs to do to expose an application to the Internet is create an Ingress controller following a supplied template that includes a fully qualified domain name (FQDN) within a domain managed by the Kubernetes installation. Kubernetes uses the template to allocate an IP address for the Ingress controller, create the DNS A record to map the FQDN to the IP address, and generate TLS certificates for the FQDN and add them to the Ingress controller. Cleanup is just as easy: when the Ingress is removed, the DNS records are cleaned up.
The solution leverages the following technologies (we provide installation and configuration instructions below):
- Kubernetes.
- ExternalDNS.
- cert-manager.
- Let’s Encrypt.
- NGINX Ingress Controller from F5 NGINX, based on either NGINX Open Source or NGINX Plus. The solution doesn’t work with the NGINX Ingress Controller maintained by the Kubernetes community. For more details on the differences between the two projects, see our blog.
Before configuring the solution, you need:
- A Kubernetes cloud installation with an egress (
LoadBalancer) object. The solution uses Linode, but other cloud providers also work. - A domain name hosted with Cloudflare, which we chose because it’s one of the supported DNS providers for cert-manager and supports ExternalDNS (in beta as of the time of writing). We strongly recommend that the domain not be used for production or any other critical purpose.
- Access to the Cloudflare API, which is included in the free tier.
- Helm for installing and deploying Kubernetes.
kubectlas the command‑line interface for Kubernetes.- Optionally, K9s, a well‑constructed tangible user interface (TUI) that provides a more structured way to interact with Kubernetes.
We also assume you have a basic understanding of Kubernetes (how to apply a manifest, use a Helm chart, and issue kubectl commands to view output and troubleshoot). Understanding the basic concepts of Let’s Encrypt is helpful but not required; for an overview, see our blog. You also don’t need to know how cert-manager works, but if you’re interested how it (and certificates in general) work with NGINX Ingress Controller, see my recent post, Automating Certificate Management in a Kubernetes Environment.
We have tested the solution on both macOS and Linux. We haven’t tested on Windows Subsystem for Linux version 2 (WSL2), but don’t foresee any issues.
Note: The solution is intended as a sample proof of concept, and not for production use. In particular, it does not incorporate all best practices for operation and security. For information on those topics, see the cert-manager and ExternalDNS documentation.
Deploying the Solution
Follow the steps in these sections to deploy the solution:
- Download Software
- Deploy NGINX Ingress Controller
- Deploy cert-manager
- Deploy ExternalDNS
- Deploy the Sample Application
- Validate the Solution
Download Software
- Download your Cloudflare API Token.
- Clone the NGINX Ingress Controller repository:
$ git clone https://github.com/nginxinc/kubernetes-ingress.gitCloning into 'kubernetes-ingress'...
remote: Enumerating objects: 45176, done.
remote: Counting objects: 100% (373/373), done.
remote: Compressing objects: 100% (274/274), done.
remote: Total 45176 (delta 173), reused 219 (delta 79), pack-reused 44803
Receiving objects: 100% (45176/45176), 60.45 MiB | 26.81 MiB/s, done.
Resolving deltas: 100% (26592/26592), done.- Verify that you can connect to the Kubernetes cluster.
$ kubectl cluster-infoKubernetes control plane is running at https://ba35bacf-b072-4600-9a04-e04...6a3d.us-west-2.linodelke.net:443
KubeDNS is running at https://ba35bacf-b072-4600-9a04-e04...6a3d.us-west-2.linodelke.net:443/api/v1/namespaces/kube-system/services/kube-dns:dns/proxy

To further debug and diagnose cluster problems, use 'kubectl cluster-info dump'.
Deploy NGINX Ingress Controller
- Using Helm, deploy NGINX Ingress Controller. Note that we are adding three non‑standard configuration options:
$ helm install nginx-kic nginx-stable/nginx-ingress --namespace nginx-ingress --set controller.enableCustomResources=true --create-namespace --set controller.enableCertManager=true --set controller.enableExternalDNS=trueNAME: nginx-kic
LAST DEPLOYED: Day Mon DD hh:mm:ss YYYY
NAMESPACE: nginx-ingress
STATUS: deployed
REVISION: 1
TEST SUITE: None
NOTES:
The NGINX Ingress Controller has been installed.controller.enableCustomResources– Instructs Helm to install the custom resource definitions (CRDs) used to create the NGINX VirtualServer and VirtualServerRoute custom resources.controller.enableCertManager– Configures NGINX Ingress Controller to communicate with cert-manager components.controller.enableExternalDNS– Configures the Ingress Controller to communicate with ExternalDNS components.
- Verify that NGINX Ingress Controller is running and note the value in the
EXTERNAL-IPfield – it’s the IP address for NGINX Ingress Controller (here,www.xxx.yyy.zzz). The output is spread across two lines for legibility.
$ kubectl get services --namespace nginx-ingressNAME                      TYPE           CLUSTER-IP      ...
nginx-kic-nginx-ingress   LoadBalancer   10.128.152.88   ...

   ... EXTERNAL-IP       PORT(S)                      AGE
   ... www.xxx.yyy.zzz   80:32457/TCP,443:31971/TCP   3h8m
Deploy cert-manager
In the solution, cert-manager uses the DNS-01 challenge type when obtaining a TLS certificate, which requires the Cloudflare API token be provided during creation of the ClusterIssuer resource. In the solution, the API token is provided as a Kubernetes Secret.
- Using Helm, deploy cert-manager:
$ helm install cert-manager jetstack/cert-manager --namespace cert-manager --create-namespace --version v1.9.1 --set installCRDs=trueNAME: cert-manager
LAST DEPLOYED: Day Mon DD hh:mm:ss YYYY
NAMESPACE: cert-manager
STATUS: deployed
REVISION: 1
TEST SUITE: None
NOTES:
cert-manager v1.9.1 has been deployed successfully!- Deploy the Cloudflare API token as a Kubernetes Secret, substituting it for
<your-API-token>:
$ kubectl apply -f - <<EOFapiVersion: v1 kind: Secret metadata: name: Cloudflare-api-token-secret namespace: cert-manager type: Opaque stringData: api-token: "<your-API-token>" EOF
secret/Cloudflare-api-token-secret created- Create a ClusterIssuer object, specifying
Cloudflare-api-token-secret(defined in the previous step) as the place to retrieve the token. If you wish, you can replaceexample-issuerin themetadata.namefield (andexample-issuer-account-keyin thespec.acme.privateKeySecretRef.namefield) with a different name.
$ kubectl apply -f - <<EOFapiVersion: cert-manager.io/v1 kind: ClusterIssuer metadata: name: example-issuer namespace: cert-manager spec: acme: email: example@example.com server: https://acme-v02.api.letsencrypt.org/directory privateKeySecretRef: name: example-issuer-account-key solvers: - dns01: Cloudflare: apiTokenSecretRef: name: Cloudflare-api-token-secret key: api-token EOF
clusterissuer.cert-manager.io/example-issuer created- Verify that the ClusterIssuer is deployed and ready (the value in the
READYfield isTrue).
$ kubectl get clusterissuerNAME             READY   AGE
example-issuer   True    3h9m
Deploy ExternalDNS
Like cert-manager, the ExternalDNS project requires a Cloudflare API Token to manage DNS. The same token can be used for both projects, but that is not required.
- Create the ExternalDNS CRDs for NGINX Ingress Controller to enable integration between the projects.
$ kubectl create -f ./kubernetes-ingress/deployments/common/crds/externaldns.nginx.org_dnsendpoints.yamlcustomresourcedefinition.apiextensions.k8s.io/dnsendpoints.externaldns.nginx.org created- Create the External DNS service (
external-dns). Because the manifest is rather long, here we break it into two parts. The first part configures accounts, roles, and permissions:
$ kubectl apply -f - <<EOFapiVersion: v1 kind: ServiceAccount metadata: name: external-dns --- apiVersion: rbac.authorization.k8s.io/v1 kind: ClusterRole metadata: name: external-dns rules: - apiGroups: [""] resources: ["services","endpoints","pods"] verbs: ["get","watch","list"] - apiGroups: ["extensions","networking.k8s.io"] resources: ["ingresses"] verbs: ["get","watch","list"] - apiGroups: ["externaldns.nginx.org"] resources: ["dnsendpoints"] verbs: ["get","watch","list"] - apiGroups: ["externaldns.nginx.org"] resources: ["dnsendpoints/status"] verbs: ["update"] - apiGroups: [""] resources: ["nodes"] verbs: ["list","watch"] --- apiVersion: rbac.authorization.k8s.io/v1 kind: ClusterRoleBinding metadata: name: external-dns-viewer roleRef: apiGroup: rbac.authorization.k8s.io kind: ClusterRole name: external-dns subjects: - kind: ServiceAccount name: external-dns namespace: default EOF
serviceaccount/external-dns created
clusterrole.rbac.authorization.k8s.io/external-dns created
clusterrolebinding.rbac.authorization.k8s.io/external-dns-viewer created- The second part of the manifest creates the ExternalDNS deployment:
$  kubectl apply -f - <<EOF --- apiVersion: apps/v1 kind: Deployment metadata: name: external-dns spec: strategy: type: Recreate selector: matchLabels: app: external-dns template: metadata: labels: app: external-dns spec: serviceAccountName: external-dns containers: - name: external-dns image: k8s.gcr.io/external-dns/external-dns:v0.12.0 args: - --source=service - --source=ingress - --source=crd - --crd-source-apiversion=externaldns.nginx.org/v1 - --crd-source-kind=DNSEndpoint - --domain-filter=example.com - --provider=Cloudflare env: - name: CF_API_TOKEN value: "<your-API-token>" - name: FREE_TIER value: "true" EOF
serviceaccount/external-dns created
clusterrole.rbac.authorization.k8s.io/external-dns created
clusterrolebinding.rbac.authorization.k8s.io/external-dns-viewer created
deployment.apps/external-dns created- Creates a ServiceAccount object called
external-dnsto manage all write and update operations for managing DNS. - Creates a ClusterRole object (also called
external-dns) that defines the required permissions. - Binds the ClusterRole to the ServiceAccount.
- Creates a domain filter, which limits the scope of possible damage done by ExternalDNS as it manages domains. For example, you might specify the domain names of staging environments to prevent changes to production environments. In this example, we set
domain-filtertoexample.com. - Sets the
CF_API_TOKENenvironment variable to your Cloudflare API Token. For<your-API-token>, substitute either the actual token or a Secret containing the token. In the latter case, you also need to project the Secret into the container using an environment variable. - Sets the
FREE_TIERenvironment variable to"true"(appropriate unless you have a paid Cloudflare subscription).
Deploy the Sample Application
Use the standard NGINX Ingress Controller sample application called Cafe for testing purposes.
- Deploy the Cafe application.
$ kubectl apply -f ./kubernetes-ingress/examples/ingress-resources/complete-example/cafe.yamldeployment.apps/coffee created
service/coffee-svc created
deployment.apps/tea created
service/tea-svc created- Deploy NGINX Ingress Controller for the Cafe application. Note the following settings:Note that the time it takes for this step to complete is highly dependent on the DNS provider, as Kubernetes is interacting with the provider’s DNS API.
$ kubectl apply -f - <<EOFapiVersion: k8s.nginx.org/v1 kind: VirtualServer metadata: name: cafe spec: host: cafe.example.com tls: secret: cafe-secret cert-manager: cluster-issuer: example-issuer externalDNS: enable: true upstreams: - name: tea service: tea-svc port: 80 - name: coffee service: coffee-svc port: 80 routes: - path: /tea action: pass: tea - path: /coffee action: pass: coffee EOF
virtualserver.k8s.nginx.org/cafe created
kind: VirtualServer– We are using the NGINX VirtualServer custom resource, not the standard Kubernetes Ingress resource.spec.host– Replacecafe.example.comwith the name of the host you are deploying. The host must be within the domain being managed with ExternalDNS.spec.tls.cert-manager.cluster-issuer– If you’ve been using the values specified in this post, this isexample-issuer. If necessary, substitute the name you chose in Step 3 of Deploy cert‑manager.spec.externalDNS.enable– The valuetruetells ExternalDNS to create a DNSArecord.
Validate the Solution
- Verify the DNS
Arecord – in particular that in theANSWERSECTIONblock the FQDN (here,cafe.example.com) is mapped to the correct IP address (www.xxx.yyy.zzz).
$ dig cafe.example.com
; <<>> DiG 9.10.6 <<>> cafe.example.com
;; global options: +cmd
;; Got answer:
;; ->>HEADER<<- opcode: QUERY, status: NOERROR, id: 22633
;; flags: qr rd ra; QUERY: 1, ANSWER: 1, AUTHORITY: 0, ADDITIONAL: 1

;; OPT PSEUDOSECTION:
; EDNS: version: 0, flags:; udp: 4096
;; QUESTION SECTION:
;cafe.example.com.		IN	A

;; ANSWER SECTION:
cafe.example.com.	279	IN	A	www.xxx.yyy.zzz

;; Query time: 1 msec
;; SERVER: 2607:fb91:119b:4ac4:2e0:xxxx:fe1e:1359#53(2607:fb91:119b:4ac4:2e0:xxxx:fe1e:1359)
;; WHEN: Day Mon DD hh:mm:ss TZ YYYY
;; MSG SIZE rcvd: 67- Check that the certificate is valid (the value in the
READYfield isTrue).
$ kubectl get certificatesNAME          READY   SECRET        AGE
cafe-secret True cafe-secret 8m51s- Verify that you can reach the application.
$ curl https://cafe.example.com/coffeeServer address: 10.2.2.4:8080
Server name: coffee-7c86d7d67c-lsfs6
Date: DD/Mon/YYYY:hh:mm:ss +TZ-offset
URI: /coffee
Request ID: 91077575f19e6e735a91b9d06e9684cd
$ curl https://cafe.example.com/tea
Server address: 10.2.2.5:8080
Server name: tea-5c457db9-ztpns
Date: DD/Mon/YYYY:hh:mm:ss +TZ-offset
URI: /tea
Request ID: 2164c245a495d22c11e900aa0103b00f
What Happens When a Developer Deploys NGINX Ingress Controller
A lot happens under the covers once the solution is in place. The diagram shows what happens when a developer deploys the NGINX Ingress Controller with an NGINX VirtualServer custom resource. Note that some operational details are omitted.
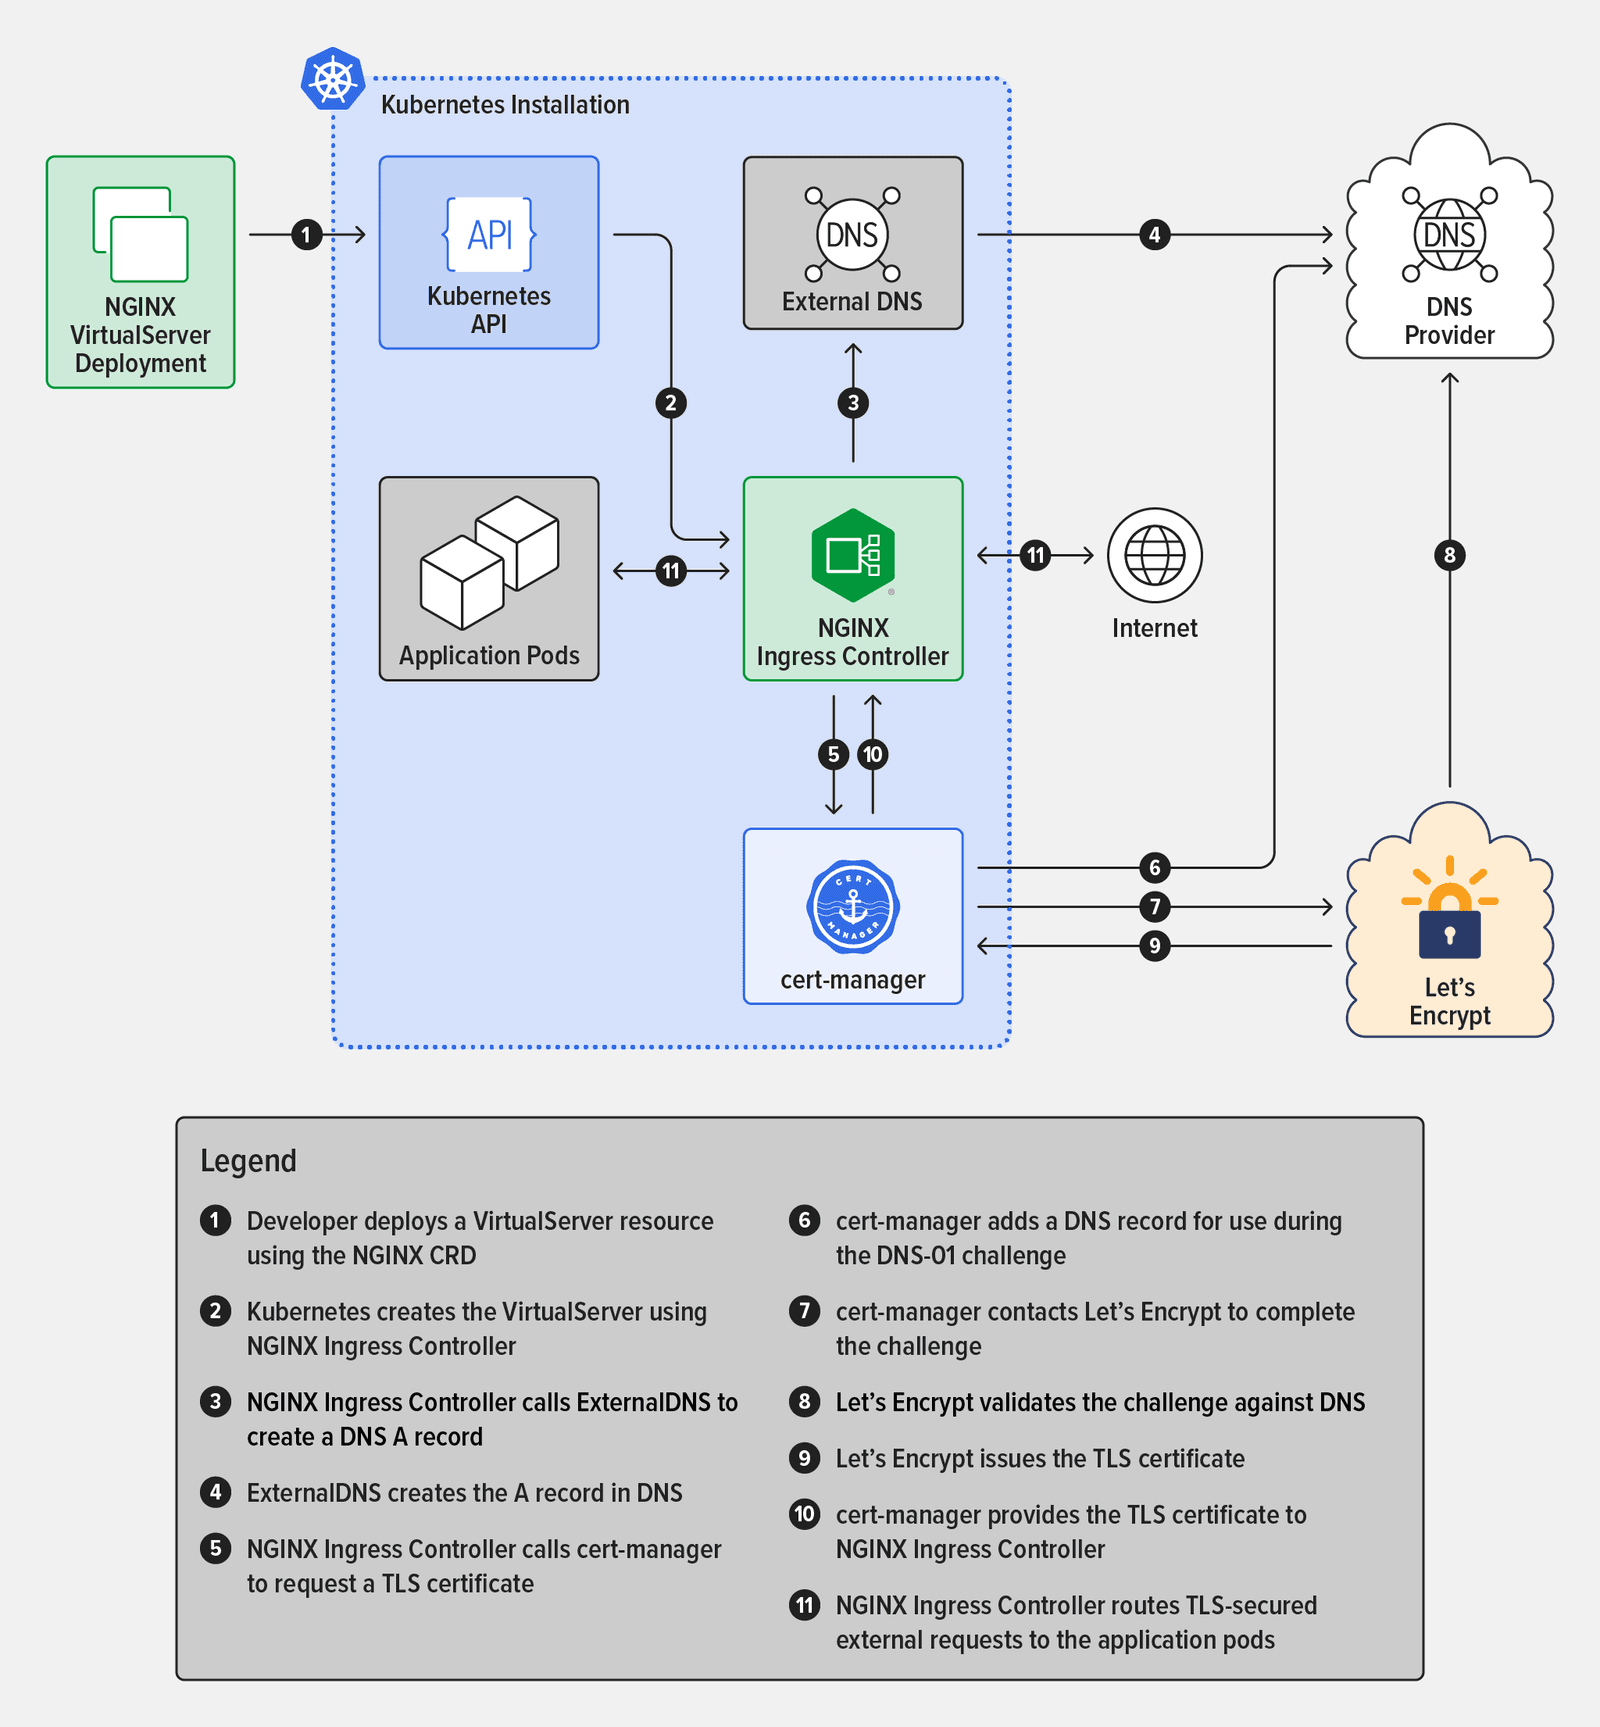
- Developer deploys a VirtualServer resource using the NGINX CRD
- Kubernetes creates the VirtualServer using NGINX Ingress Controller
- NGINX Ingress Controller calls ExternalDNS to create a DNS
Arecord - ExternalDNS creates the
Arecord in DNS - NGINX Ingress Controller calls cert-manager to request a TLS certificate
- cert-manager adds a DNS record for use during the DNS-01 challenge
- cert-manager contacts Let’s Encrypt to complete the challenge
- Let’s Encrypt validates the challenge against DNS
- Let’s Encrypt issues the TLS certificate
- cert-manager provides the TLS certificate to NGINX Ingress Controller
- NGINX Ingress Controller routes TLS‑secured external requests to the application pods
Troubleshooting
Given the complexity of Kubernetes along with the components we are using, it is difficult to provide a comprehensive troubleshooting guide. That said, there are some basic suggestions to help you determine the problem.
- Use the
kubectlgetandkubectldescribecommands to validate the configuration of deployed objects. - Use the
kubectllogs<component>command to view log files for the various deployed components. - Use K9s to inspect the installation; the software highlights problems in yellow or red (depending on severity) and provides an interface to access logs and details about objects.
If you are still having issues, please find us on the NGINXCommunity Slack and ask for help! We have a vibrant community and are always happy to work through issues.
To try the NGINX Ingress Controller based on NGINX Plus, start your 30-day free trial today or contact us to discuss your use cases.
About the Author
Related Blog Posts

Automating Certificate Management in a Kubernetes Environment
Simplify cert management by providing unique, automatically renewed and updated certificates to your endpoints.

Secure Your API Gateway with NGINX App Protect WAF
As monoliths move to microservices, applications are developed faster than ever. Speed is necessary to stay competitive and APIs sit at the front of these rapid modernization efforts. But the popularity of APIs for application modernization has significant implications for app security.
How Do I Choose? API Gateway vs. Ingress Controller vs. Service Mesh
When you need an API gateway in Kubernetes, how do you choose among API gateway vs. Ingress controller vs. service mesh? We guide you through the decision, with sample scenarios for north-south and east-west API traffic, plus use cases where an API gateway is the right tool.
Deploying NGINX as an API Gateway, Part 2: Protecting Backend Services
In the second post in our API gateway series, Liam shows you how to batten down the hatches on your API services. You can use rate limiting, access restrictions, request size limits, and request body validation to frustrate illegitimate or overly burdensome requests.
New Joomla Exploit CVE-2015-8562
Read about the new zero day exploit in Joomla and see the NGINX configuration for how to apply a fix in NGINX or NGINX Plus.
Why Do I See “Welcome to nginx!” on My Favorite Website?
The ‘Welcome to NGINX!’ page is presented when NGINX web server software is installed on a computer but has not finished configuring