One of the most beneficial features of the cloud is the ability to automatically scale the number of computing instances. With AWS Auto Scaling, you can change the number of EC2 instances in an Auto Scaling group, either manually or automatically, based on schedule or demand. Auto Scaling helps reduce cost by adjusting the number of instances to the right number for the current workload. Additionally, Auto Scaling restarts failed instances, which adds resilience to your applications.
Load balancing is crucial when using Auto Scaling. AWS provides load balancing of instances of Auto Scaling groups by integrating its built‑in load balancers – Elastic Load Balancer (ELB), now officially called Classic Load Balancer, and Application Load Balancer (ALB) – with Auto Scaling. NGINX Plus provides advanced cloud load balancing for any cloud environment, including AWS, and supports AWS Auto Scaling groups.
There are three main reasons to choose NGINX Plus as a replacement or an addition to the built‑in AWS cloud load balancers:
- NGINX Plus provides multiple advanced features that ELB and ALB lack.
- The pricing model for the AWS load balancers (especially ALB) is complex, making it hard to predict costs. NGINX Plus pricing is straightforward, whether you purchase the NGINX Plus subscription directly from us or run prebuilt NGINX Plus instances from the AWS Marketplace, which are billed at a set hourly rate.
- NGINX Plus doesn’t tie you to platform‑specific APIs, allowing you to reuse the load balancing configuration across multiple cloud platforms.
To see how NGINX Plus compares to (and works together with) the AWS built‑in solutions, read our blog posts on ELB and ALB.
In this blog post we show two methods of configuring NGINX Plus to load balance Auto Scaling groups, and explain when it makes sense to use each method:
After reading this blog post you will be ready to deploy NGINX Plus on AWS to provide advanced load balancing for Auto Scaling groups.
The Sample AWS Auto Scaling Environment
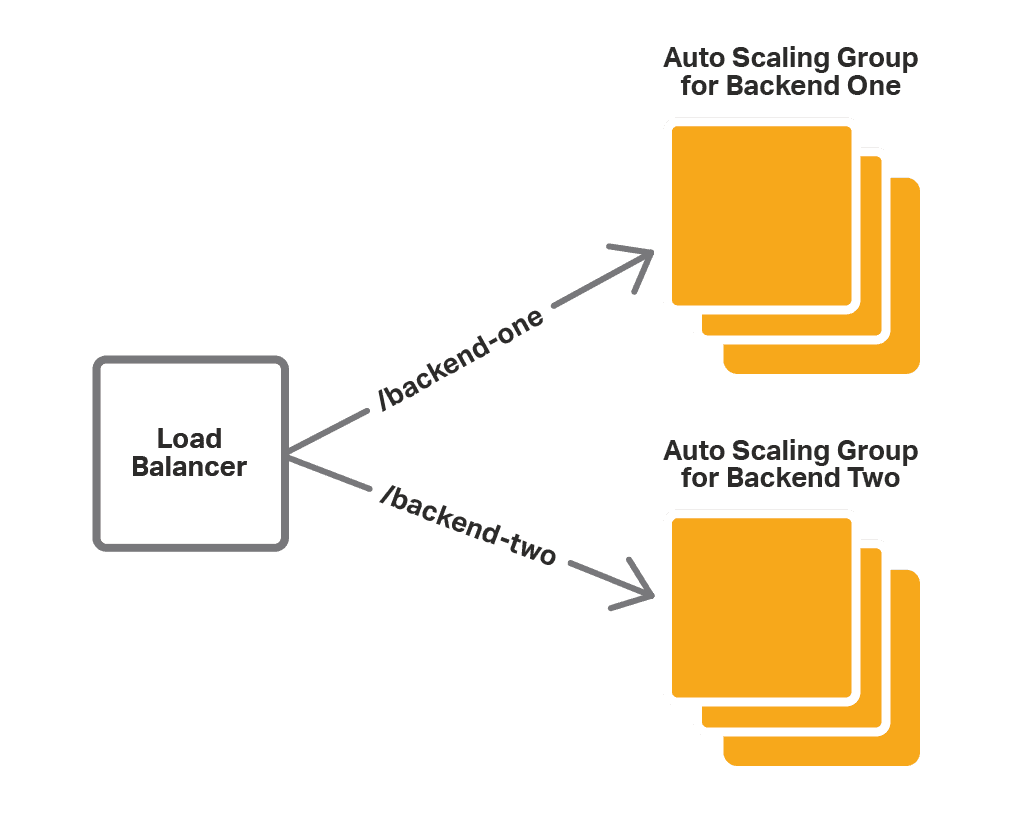
We’re using a sample application environment to illustrate the two methods for using NGINX Plus to load balance Auto Scaling groups. Our backend web application consists of two services – Backend One and Backend Two – each exposed on port 80. For each service there is an Auto Scaling group of multiple application instances. The load balancer routes client requests to the appropriate backend based on the request URI:
- Requests for /backend‑one go to Backend One.
- Requests for /backend‑two go to Backend Two.
When we scale the application Auto Scaling groups (either automatically or manually), the load balancer configuration must be updated to reflect the new number of application instances. The built‑in AWS load balancers do this automatically. For NGINX Plus, we need to propagate scaling events to the configuration with one of the methods mentioned above (NGINX Plus in front of ELB, or NGINX Plus with the integration software).
Another way to update the NGINX Plus configuration in response to scaling events is with an external service registry. NGINX Plus supports integration with service discovery systems that provide a DNS interface, such as Consul. In this blog post we focus on solutions that do not rely on using external systems and that are easy to set up and use.
Using NGINX Plus in Front of ELB
If you are already using Auto Scaling groups and ELB, the easiest way to bring some of the advanced features of NGINX Plus to your application is to place NGINX Plus in front of the ELB cloud load balancers, as shown in the diagram:
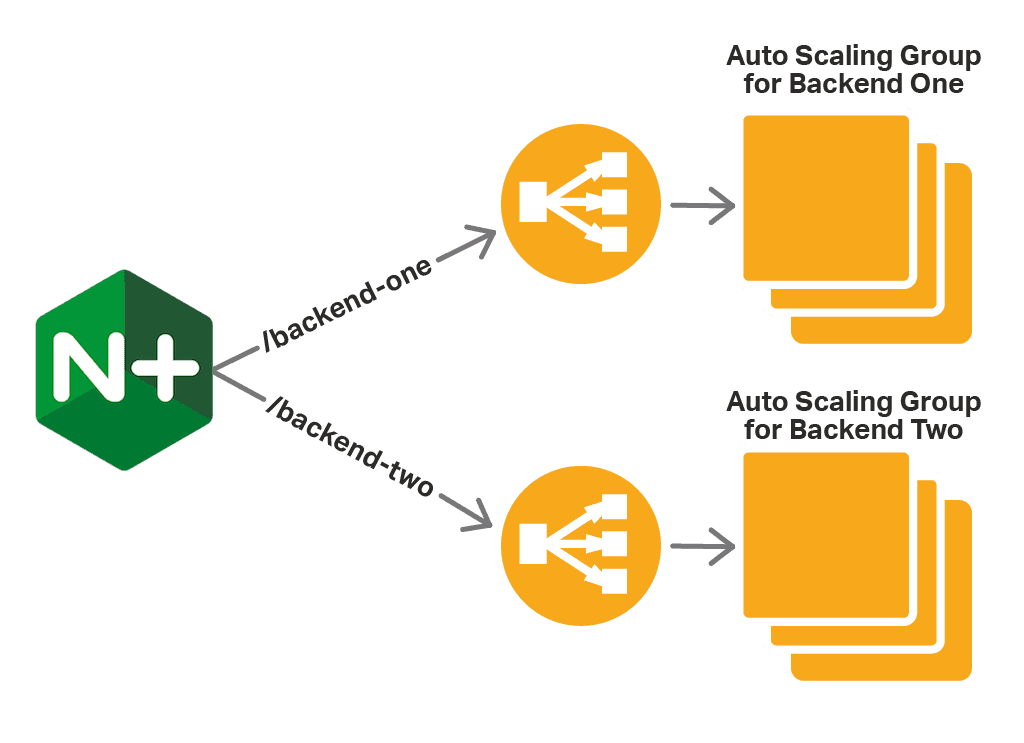
In this case NGINX Plus acts as a proxy/load balancer for one or more ELBs. Using its advanced routing capabilities, NGINX Plus forwards requests to the appropriate ELB based on the request URI. The ELB then passes the request to one of the instances in the Auto Scaling group. In this configuration, ELB provides the support for scaling.
Here is the NGINX Plus configuration.
resolver 169.254.169.253 valid=10s;
upstream backend-one {
    zone backend-one 64k;
    server DNS-name-of-ELB-for-Backend-One resolve;
}

upstream backend-two {
    zone backend-two 64k;
    server DNS-name-of-ELB-for-Backend-Two resolve;
}

server {
    listen 80;

    location /backend-one {
        proxy_set_header Host $host;
        proxy_pass http://backend-one;
    }

    location /backend-two {
        proxy_set_header Host $host;
        proxy_pass http://backend-two;
    }
}- The
resolverdirective defines the DNS server that NGINX Plus uses to resolve the DNS names of the internal ELB instances. Here it is the IP address of the AWS DNS server. - We create two
upstreamblocks, one for each Auto Scaling group corresponding to our services, Backend One and Backend Two. We identify the Auto Scaling group by the DNS name of the ELB that load balances traffic to it. Using theresolveparameter, we tell NGINX Plus to periodically re‑resolve the name – the frequency is set by thevalidparameter to theresolverdirective discussed in the previous bullet. Here we set it to 10 seconds because the IP addresses of ELB are subject to frequent change. Thezonedirective allocates memory (here up to 64 KB) for storing the resolved IP addresses. - We define a virtual
serverthat listens on port 80. Thelocationblocks tell NGINX Plus to pass requests for /backend‑one to the ELB for the Backend One Auto Scaling group and requests for /backend‑two to the ELB for the Backend Two Auto Scaling group.
As you can see, this method is easy to set up and use, especially if you are already using ELB. However, there are several drawbacks:
- Limited load‑balancing options. Because NGINX Plus passes requests to ELB, not to the backend instances directly, it is the ELB that is doing load balancing. For this reason, you cannot take advantage of NGINX Plus’ more sophisticated load‑balancing algorithms and session‑persistence options.
- Redundancy. NGINX Plus can do load balancing, so ELB is redundant – we’re using it only because it is natively integrated with Auto Scaling.
- Limited protocol support. Unlike NGINX Plus, ELB does not support WebSocket and UDP.
The next method does not rely on ELB and consequently does not have those disadvantages.
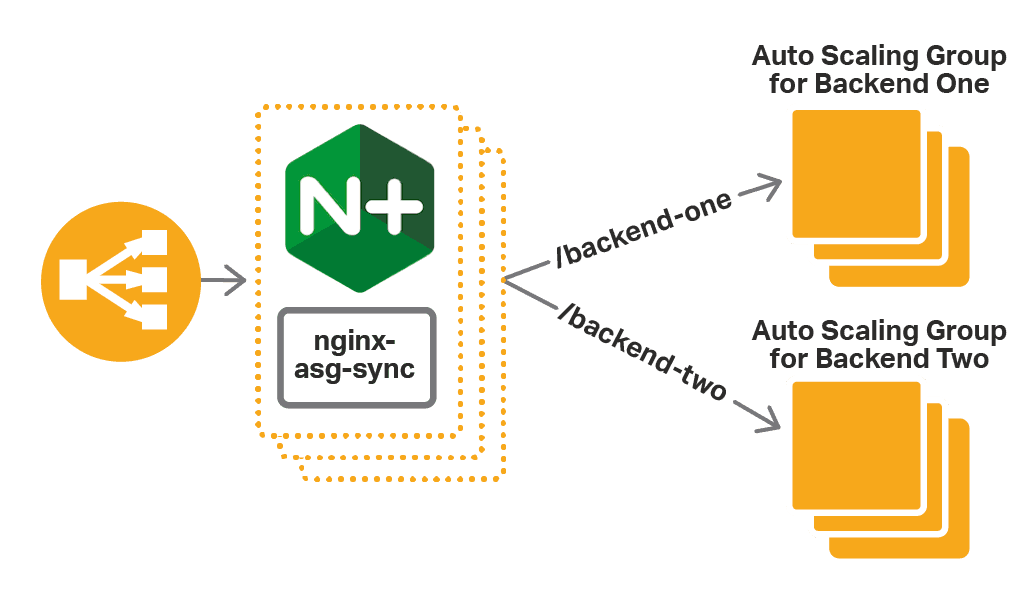
Using NGINX Plus with the Integration Software
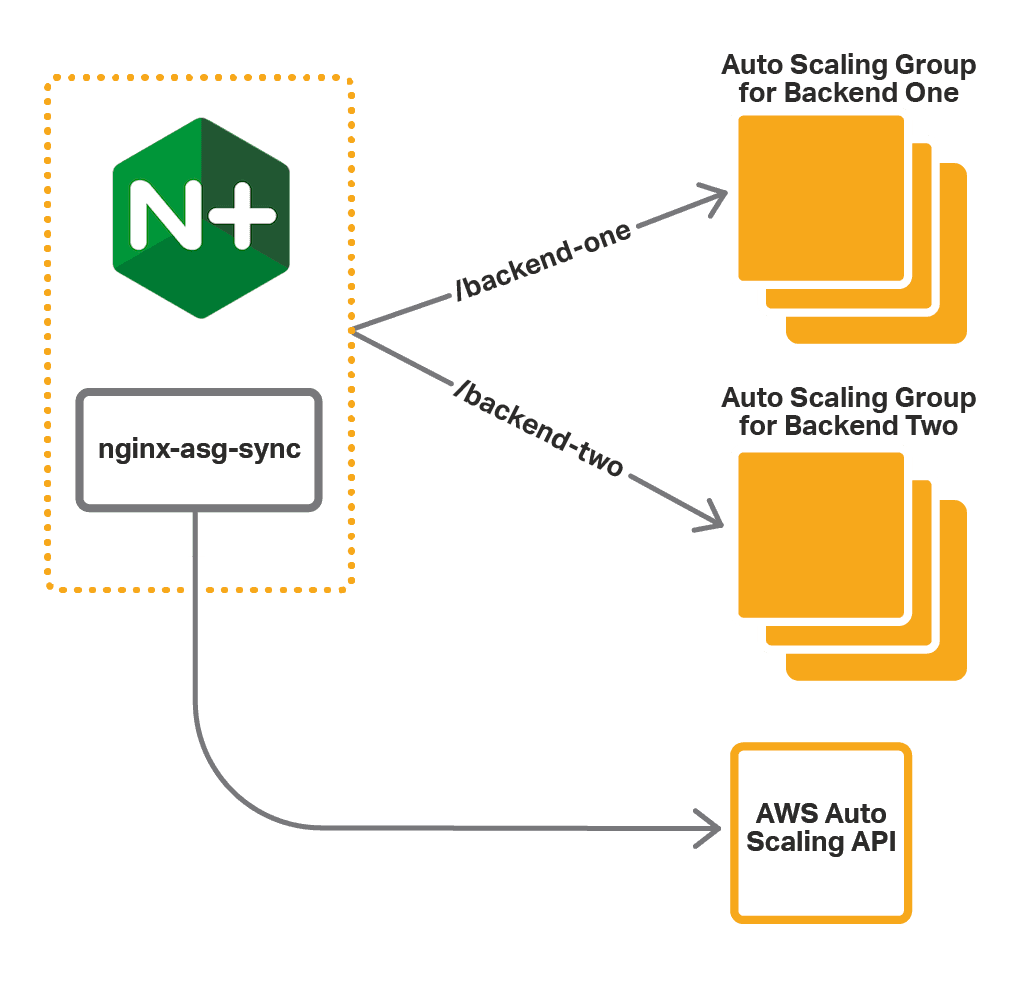
With this method, you install additional integration software along with NGINX Plus. The software (nginx-asg-sync) constantly monitors Auto Scaling groups. When it sees that a scaling event has happened, it adds or removes backend instances from the NGINX Plus configuration. As shown, nginx-asg-sync learns about changes to Auto Scaling groups via the AWS Auto Scaling API.
To use the integration software, perform the following steps:
- Set up access to the AWS API
- Install the integration software
- Configure NGINX Plus
- Configure the integration software
The instructions assume that the Auto Scaling groups for the backends already exist. They also assume that NGINX Plus is running on an Amazon Linux AMI.
Step 1 – Set Up Access to the AWS API
Communication with the Auto Scaling API is authenticated, so you must provide credentials for nginx-asg-sync. AWS uses IAM roles to handle credentials, so you need to create a role for the NGINX Plus instance before launching it. For step‑by‑step instructions, see IAM Roles for Amazon EC2 in the AWS documentation.
- Create an IAM role and attach the predefined
AmazonEC2ReadOnlyAccesspolicy to it. This policy allows read‑only access to EC2 APIs. - When you launch the NGINX Plus instance, add this IAM role to the instance.
Step 2 – Install the Integration Software
To install the integration software, download the package for your operating system from the nginx-asg-sync GitHub repository, and install it on the instance where NGINX Plus is running.
- For Amazon Linux, CentOS, and RHEL:
$ sudo rpm -i package-name.rpm- For Ubuntu:
$ sudo dpkg -i package-name.debFor complete installation instructions, see the documentation on GitHub.
Step 3 – Configure NGINX Plus
The integration software updates NGINX Plus configuration using the dynamic reconfiguration and live activity monitoring APIs. For the software to work properly, you must configure those APIs as well as declare the necessary upstream groups:
- Configure the API endpoints for on‑the‑fly reconfiguration and live activity monitoring. The integration software uses these endpoints to add and remove backend instances from upstream groups.
- Create an
upstreamblock for each Auto Scaling group. Do not define any servers in the block, as nginx-asg-sync adds and removes them automatically in response to scaling events.
The following example represents the configuration for our simple web application:
upstream backend-one {    zone backend-one 64k;
    state /var/lib/nginx/state/backend-one.conf;
}

upstream backend-two {
    zone backend-two 64k;
    state /var/lib/nginx/state/backend-two.conf;
}

server {
    listen 80;

    status_zone backend;

    location /backend-one {
        proxy_set_header Host $host;
        proxy_pass http://backend-one;
    }

    location /backend-two {
        proxy_set_header Host $host;
        proxy_pass http://backend-two;
    }
}

server {
    listen 8080;

    root /usr/share/nginx/html;

    location = / {
        return 302 /status.html;
    }

    location = /status.html {}

    location /status {
        access_log off;
        status;
    }

    location /upstream_conf {
        upstream_conf;
    }
}- As in the ELB example, we declare two upstream groups – backend‑one and backend‑two, which correspond to our Auto Scaling groups. Here, however, we do not add any servers to the upstream groups, because the servers will be added by nginx‑aws‑sync. The
statedirective names the file where the dynamically configurable list of servers is stored, enabling it to persist across restarts of NGINX Plus. - We define a virtual
serverthat listens on port 80. In contrast to the ELB example, NGINX Plus passes requests for /backend‑one directly to the instances of the Backend One group, and requests for /backend‑two directly to the instances of the Backend Two group. - We define a second virtual server listening on port 8080 and configure the NGINX Plus APIs on it:
- The on‑the‑fly API is available at 127.0.0.1:8080/upstream_conf
- The status API is available at 127.0.0.1:8080/status
Step 4 – Configure the Integration Software
The integration software is configured in the file aws.yaml in the /etc/nginx folder. For our application, we define the following configuration:
region: us-west-2upstream_conf_endpoint: http://127.0.0.1:8080/upstream_conf
status_endpoint: http://127.0.0.1:8080/status
sync_interval_in_seconds: 5
upstreams:
 - name: backend-one
   autoscaling_group: backend-one-group
   port: 80
   kind: http
 - name: backend-two
   autoscaling_group: backend-two-group
   port: 80
kind: http- The
regionkey defines the AWS region where we deploy our application. - The
upstream_conf_endpointandstatus_endpointkeys define the NGINX Plus API endpoints, which we configured in Step 3. - The
sync_interval_in_secondskey defines the synchronization interval: nginx-asg-sync checks for scaling updates every 5 seconds. - The
upstreamskey defines the list of upstream groups. For each upstream group we specify:name– The name we specified for theupstreamblock in Step 3.autoscaling_group– The name of the corresponding Auto Scaling group.port– The port on which our backend services are exposed.kind– The protocol of the traffic NGINX Plus load balances to the backend application, herehttp. If the application uses TCP/UDP, specifystreaminstead.
After you edit the aws.yaml file, restart the software:
$ sudo restart nginx-asg-syncTesting Load Balancing and Scaling
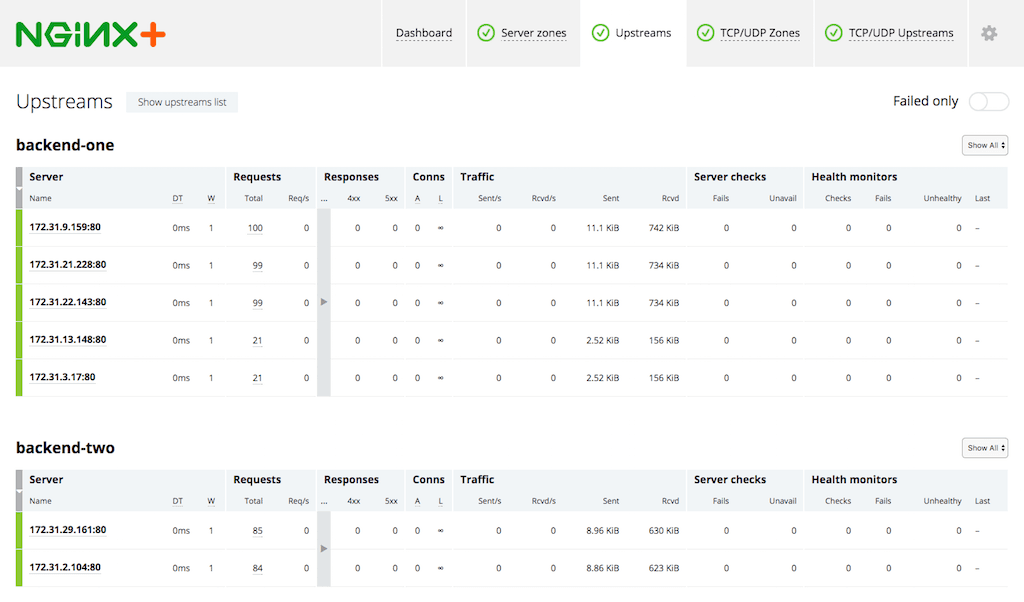
In the steps above, we configured NGINX Plus to load balance Auto Scaling groups for our application. Now we can test it. NGINX Plus distributes requests with the /backend‑one URI to the instances of the Backend One group, and requests with the /backend‑two URI to the instances of the Backend Two group.
We can see how NGINX Plus picks up new instances when we scale our Auto Scaling groups. First, we access the live activity monitoring dashboard, accessible at /status.html on port 8080 of the NGINX Plus instance. On the Upstream tab we see the instances in our Auto Scaling groups:
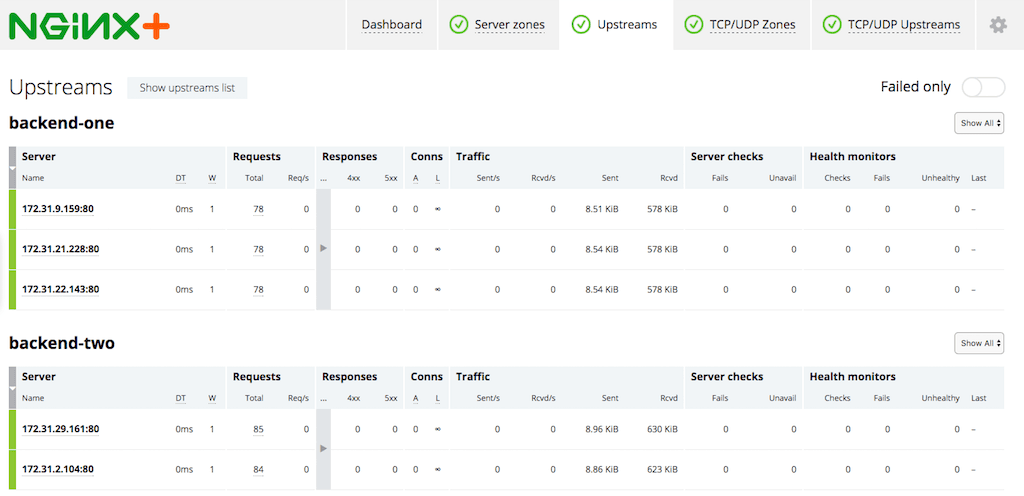
Now, we scale up the Backend One group from three to five instances by changing the capacity of the Auto Scaling group. After the new instances are launched, nginx-asg-sync adds them to the NGINX Plus configuration. Soon enough the new instances appear on the dashboard:
Making NGINX Plus Highly Available
So far, we have launched only one instance of NGINX Plus. However, for high availability, we recommend creating an Auto Scaling group for NGINX Plus itself and use ELB in front of the NGINX Plus instances. Alternatively to ELB, you can use Route 53 to route traffic to NGINX Plus instances. The diagram of our deployment with ELB looks like this:
Choosing The Right Method
So, which method of configuring NGINX Plus to load balance Auto Scaling groups is better for you? The table briefly compares the two:
NGINX Plus in Front of ELB NGINX Plus with the Integration SoftwareAdvantages Simple configuration and no installation of additional software. Full benefits of all NGINX Plus features, without any limitations imposed by the ELB method.Disadvantages Limits the number of NGINX Plus features you can use, including supported protocols. Increases cost of the deployment as well as latency. Requires installation and configuration of the integration software.Summary Use this method if its disadvantages are acceptable. Use this method to take full advantage of NGINX Plus’ capabilities.
Summary
AWS Auto Scaling provides the benefit of adjusting the number of application instances to the level of demand. NGINX Plus provides advanced load‑balancing features that can be used in conjunction with AWS Auto Scaling groups.
Try NGINX Plus with your AWS Auto Scaling groups – start your free 30-day trial or contact us to discuss your use cases.
About the Author
Related Blog Posts

Automating Certificate Management in a Kubernetes Environment
Simplify cert management by providing unique, automatically renewed and updated certificates to your endpoints.

Secure Your API Gateway with NGINX App Protect WAF
As monoliths move to microservices, applications are developed faster than ever. Speed is necessary to stay competitive and APIs sit at the front of these rapid modernization efforts. But the popularity of APIs for application modernization has significant implications for app security.
How Do I Choose? API Gateway vs. Ingress Controller vs. Service Mesh
When you need an API gateway in Kubernetes, how do you choose among API gateway vs. Ingress controller vs. service mesh? We guide you through the decision, with sample scenarios for north-south and east-west API traffic, plus use cases where an API gateway is the right tool.
Deploying NGINX as an API Gateway, Part 2: Protecting Backend Services
In the second post in our API gateway series, Liam shows you how to batten down the hatches on your API services. You can use rate limiting, access restrictions, request size limits, and request body validation to frustrate illegitimate or overly burdensome requests.
New Joomla Exploit CVE-2015-8562
Read about the new zero day exploit in Joomla and see the NGINX configuration for how to apply a fix in NGINX or NGINX Plus.
Why Do I See “Welcome to nginx!” on My Favorite Website?
The ‘Welcome to NGINX!’ page is presented when NGINX web server software is installed on a computer but has not finished configuring