
NGINX Plus Release 10 introduced support for offloading authentication from web and API services with JSON Web Tokens (JWTs, pronounced “jots”). Since the release of R10, we’ve continued to increase functionality in each new release.
Starting in NGINX Plus R14, NGINX Plus supports JWTs that contain nested claims and array data. When used in an API gateway scenario, NGINX Plus can use JWTs to authenticate clients that are requesting connections to backend services and API destinations.
I’ve occasionally been asked to provide a basic configuration that uses NGINX Plus to authenticate JWTs, and then makes more advanced load‑balancing decisions based on JWT information. The most straightforward solution is simply to allow access to a service if authentication is successful, and block or redirect the connection if unsuccessful.
The walkthrough in this post is a soup-to-nuts proof of concept for JWT authentication and content‑based routing using NGINX Plus. To cover the broadest range of possibilities, and to reduce the need for prerequisite knowledge or experience with JWTs, I’ve created a “JWT 101” walkthrough, allowing you to deploy this solution (with examples and background) with no prior knowledge of JWTs.
If you already have JWT experience or existing JWTs in your environment, you can skip the first two sections, and adapt the provided NGINX Plus configuration snippets to suit your environment and start making advanced load‑balancing decisions based on your JWT claims data.
Prerequisites
This document assumes a fresh install of NGINX Plus, with default configuration files in the following locations:
- /etc/nginx/nginx.conf
- /etc/nginx/conf.d/default.conf
For more information about installing and getting started with NGINX Plus, see the NGINX Plus Admin Guide.
All CLI commands assume root privilege, so non‑root users must have sudo permissions in their environment.
For additional background information, and for other use cases for JWTs with NGINX Plus, see the following links:
- JWT module reference documentation
- Authenticating API Clients with JWTs and NGINX Plus
- Authenticating Users to Existing Applications with OpenID Connect and NGINX Plus
Creating a JWT and Associated Signing Key
The instructions below walk you through creating a JWT from scratch with payload data specific to our example, as an illustration of how to configure NGINX Plus for basic processing of JWT claims. If you use an existing JWT instead of the sample one, you need to make sure that your “secrets” file contains the Base64URL‑encoded string that matches the signing key you use to create the JWT. You probably also need to modify the claims in the JWT payload.
Note: No matter how you generate your JWT, you must use Base64URL encoding, which correctly handles padding (done with the = character) as well as other non‑HTTP compliant characters typically used in Base64 encoding. Many tools handle this automatically, but manual CLI‑based Base64 encoders and some JWT‑creation tools do not. For more info on Base64URL encoding, see base64url encoding by Brock Allen and RFC 4648.
For this example, we’re using the GUI at jwt.io (which correctly does Base64URL encoding) to create a symmetric HS256 JWT. The following screenshot shows how the GUI looks after you enter the values specified in the instructions below and the signature is verified.
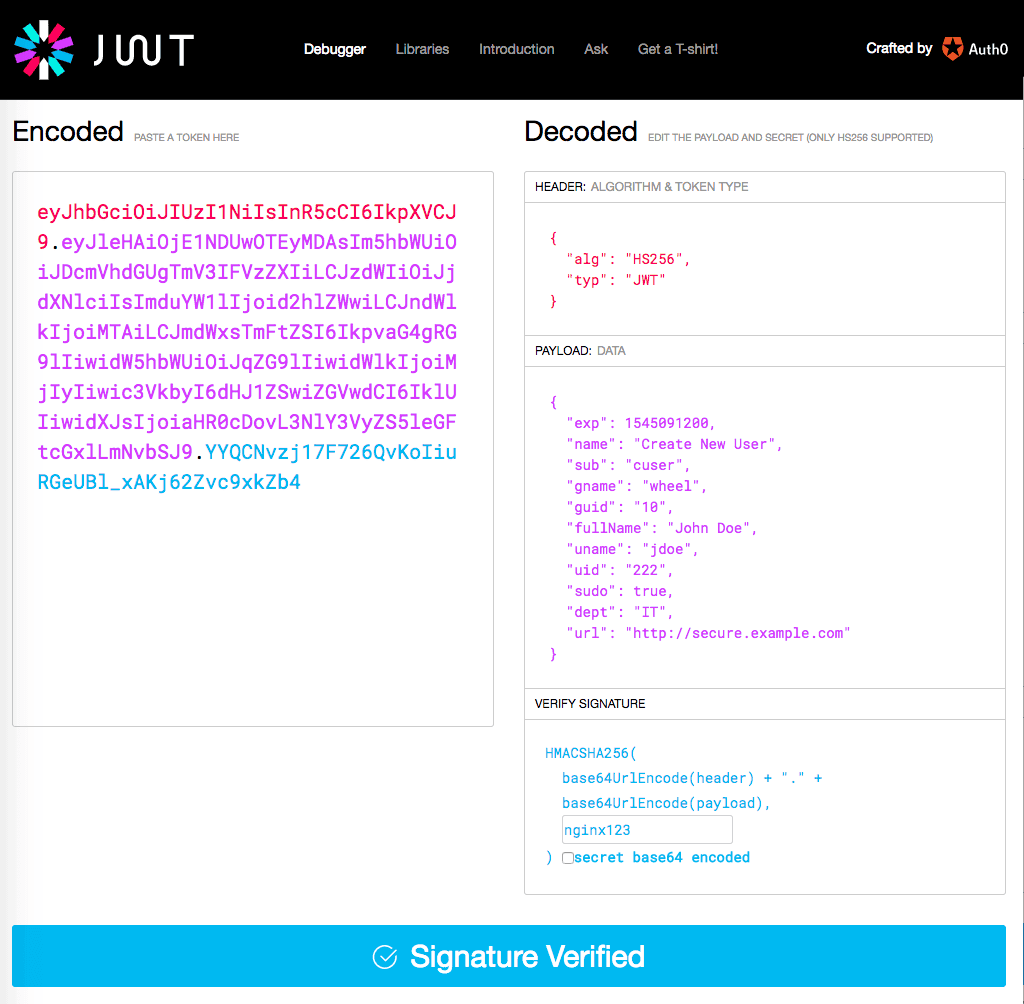
Working in the GUI at jwt.io, generate an HS256 JWT by verifying or inserting the indicated values in the fields of the Decoded column on the right:
- Verify that the following default value appears in the HEADER field, modifying the contents to match if necessary:
{  "alg": "HS256",
  "typ": "JWT"
}- In the VERIFY SIGNATURE field, replace the value in the box (by default,
secret) withnginx123. (You make this change before entering data in the PAYLOAD field to avoid a problem that occurs if you reverse the two steps.) - Replace the contents of the PAYLOAD field with the following:
{  "exp": 1545091200,
  "name": "Create New User",
  "sub": "cuser",
  "gname": "wheel",
  "guid": "10",
  "fullName": "John Doe",
  "uname": "jdoe",
  "uid": "222",
  "sudo": true,
  "dept": "IT",
  "url": "http://secure.example.com"
}- Note: The
expclaim sets the JWT’s expiration date and time, representing it as a UNIX epoch time (the number of seconds since midnight UTC on January 1, 1970). The sample value represents midnight UTC on December 18, 2018. To adjust the expiration date, change the epoch time. - Verify that the bar under the fields is blue and says Signature Verified.
- Copy the value in the left‑hand Encoded column into a file or buffer. It is the full text of the JWT that user jdoe needs to present in order to access http://secure.example.com, and we’ll use it in our testing below. We show the JWT with line breaks here for display purposes, but it must be presented to NGINX Plus as a single‑line string.eyJhbGciOiJIUzI1NiIsInR5cCI6IkpXVCJ9.eyJleHAiOjE1NDUwOTEyMDAsIm5hbWUiOi
JDcmVhdGUgTmV3IFVzZXIiLCJzdWIiOiJjdXNlciIsImduYW1lIjoid2hlZWwiLCJndWlkI
joiMTAiLCJmdWxsTmFtZSI6IkpvaG4gRG9lIiwidW5hbWUiOiJqZG9lIiwidWlkIjoiMjIy
Iiwic3VkbyI6dHJ1ZSwiZGVwdCI6IklUIiwidXJsIjoiaHR0cDovL3NlY3VyZS5leGFtcGx
lLmNvbSJ9.YYQCNvzj17F726QvKoIiuRGeUBl_xAKj62Zvc9xkZb4
Working on the NGINX Plus host, follow these steps to create the key file that NGINX Plus uses to verify JWTs that are signed with nginx123:
- Run this command to generate the Base64URL‑encoded string corresponding to the signature string. (The
trcommands make the character substitutions required for Base64URL encoding.)
# echo -n nginx123 | base64 | tr '+/' '-_' | tr -d '='bmdpbngxMjM- In the /etc/nginx/ directory, create the key file called api_secret.jwk to be used by NGINX Plus to verify JWT signatures. Insert the following contents. The value in the
kfield is the Base64URL‑encoded form ofnginx123, which we generated in the previous step.
{"keys":    [{
        "k":"bmdpbngxMjM",
        "kty":"oct"
    }]
}
Configuring NGINX Plus to Handle JWTs
The instructions in this section configure NGINX Plus to validate the JWT included in a request and to present a protected resource if the client is authorized (rather than the default page seen by unauthorized clients). We also define a new log format that captures JWT‑related information.
Configuring JWT Validation and Content‑Based Routing
In these instructions we’re following the standard best practice of renaming the default.conf configuration file so that NGINX Plus doesn’t read it, and creating a new configuration specifically for testing. This allows you to easily restore the default configuration when you’re done with testing or if there is a problem during testing.
- Rename default.conf:
# mv /etc/nginx/conf.d/default.conf /etc/nginx/conf.d/default.conf.bak- Create a new configuration file called jwt-test.conf in /etc/nginx/conf.d/, with the following contents. They configure JWT‑specific logging, JWT validation, and content‑based routing (a full analysis follows the snippet).
server {
    listen       80;
    access_log  /var/log/nginx/host.access.log jwt;

    location / {
        root   /usr/share/nginx/html;
        index  index.html index.htm;

        # JWT validation
        auth_jwt "JWT Test Realm" token=$arg_myjwt;
        auth_jwt_key_file /etc/nginx/api_secret.jwk;
        error_log /var/log/nginx/host.jwt.error.log debug;

        if ( $jwt_claim_uid = 222 ) {
            add_header X-jwt-claim-uid "$jwt_claim_uid" always;
            add_header X-jwt-status "Redirect to $jwt_claim_url" always;
            return 301 $jwt_claim_url;
        }

        if ( $jwt_claim_uid != 222 ) {
            add_header X-jwt-claim-uid "$jwt_claim_uid" always;
            add_header X-jwt-status "Invalid user, no redirect" always;
        }
    }
}
The directives in the location block tell NGINX Plus how to handle HTTP requests that include a JWT. (For information about the logging configuration defined by the access_log directive, see the next section.) NGINX Plus performs these steps:
- Extracts the JWT from the myjwt argument on the request string (as specified by the
tokenargument to theauth_jwtdirective). - Decodes the JWT using the signing key specified by the
auth_jwt_key-filedirective (here, api_secret.jwk). It acts on the payload as follows (these actions are inherent to JWT processing and don’t have corresponding NGINX Plus directives):- Verifies that the JWT has not expired; that is, the expiration date specified by the
expclaim in the payload is not in the past. - Creates a key‑value pair for each claim in the payload. The key name is a variable of the form
$jwt_claim_claim-name(for example,$jwt_claim_uidfor theuidclaim).
- Verifies that the JWT has not expired; that is, the expiration date specified by the
- Logs any errors to /var/log/nginx/host.jwt.error.log at the
debuglevel. - Tests whether the value of
$jwt_claim_uidis222(as specified by the twoifdirectives) and sends the appropriate response to the client. This is how information in the JWT is used to perform content‑based routing.Note: Using theifdirective to evaluate variables is not generally considered best practice, and we usually recommend using themapdirective instead. For the purposes of this simple example, though, theifdirective works as intended.- If the value is
222, NGINX Plus sends a response that redirects the client (thereturndirective) to the URL specified in the JWt’surlclaim. For debugging purposes, it adds two headers to the response (theadd_headerdirectives): the first captures the value of theuidclaim and the second records the fact that the client was redirected. - If value is not
222, NGINX Plus serves the default index page (as defined by therootandindexdirectives in the samelocationblock). Again for debugging purposes, it adds headers that capture the value of theuidclaim and record the fact that the client did not get access to the URL specified in the JWT.
- If the value is
Effectively, the configuration provides access to protected resources only to authorized users. That is, users with a valid JWT get access to the URL specified in the JWT, while users without a valid JWT get access to a default page.
Logging JWT Data
We complete the configuration of JWT handling for content‑based routing by defining a logging format called jwt, which is referenced by the access_log directive in jwt-test.conf. It captures JWT data in the access log.
- Add the following
log_formatdirective to /etc/nginx/nginx.conf:
log_format jwt '$remote_addr - $remote_user [$time_local] "$request" '               '$status $body_bytes_sent "$http_referer" "$http_user_agent" '
'$jwt_header_alg $jwt_claim_uid $jwt_claim_url';- This format includes the two JWT claims that are used in this walkthrough (
uidandurl), but you can log any JWT claim data with the variable name corresponding to the claim, in the form$jwt_claim_claim‑name. - Save nginx.conf, then run the following command to test the complete configuration (including the new jwt-test.conf file) for syntactic validity. Correct any reported errors.
# nginx -t- Reload NGINX Plus.
# nginx -s reloadTesting the Configuration
Using a browser or a CLI tool like curl, we can test that NGINX Plus is correctly validating the JWT, authenticating the client who presents it, and performing content‑based routing. (To just test authentication and validation but not content‑based routing, comment out the two if blocks in jwt-test.conf.)
To run the test, we include the myjwt argument on the request URL, providing the full text of the JWT in which the url claim is 222. Again we’ve added line breaks for display purposes.
http://example.com/index.html?myjwt=eyJhbGciOiJIUzI1NiIsInR5cCI6IkpXVCJ9.eyJleHAiO
jE1NDUwOTEyMDAsIm5hbWUiOiJDcmVhdGUgTmV3IFVzZXIiLCJzdWIiOiJjdXNlciIsImduYW
1lIjoid2hlZWwiLCJndWlkIjoiMTAiLCJmdWxsTmFtZSI6IkpvaG4gRG9lIiwidW5hbWUiOiJqZG9
lIiwidWlkIjoiMjIyIiwic3VkbyI6dHJ1ZSwiZGVwdCI6IklUIiwidXJsIjoiaHR0cDovL3NlY3VyZS5le
GFtcGxlLmNvbSJ9.YYQCNvzj17F726QvKoIiuRGeUBl_xAKj62Zvc9xkZb4
Here’s the corresponding curl command (without line breaks, so you can copy and paste it if you wish):
# curl -v example.com/index.html?myjwt=eyJhbGciOiJIUzI1NiIsInR5cCI6IkpXVCJ9.eyJleHAiOjE1NDUwOTEyMDAsIm5hbWUiOiJDcmVhdGUgTmV3IFVzZXIiLCJzdWIiOiJjdXNlciIsImduYW1lIjoid2hlZWwiLCJndWlkIjoiMTAiLCJmdWxsTmFtZSI6IkpvaG4gRG9lIiwidW5hbWUiOiJqZG9lIiwidWlkIjoiMjIyIiwic3VkbyI6dHJ1ZSwiZGVwdCI6IklUIiwidXJsIjoiaHR0cDovL3NlY3VyZS5leGFtcGxlLmNvbSJ9.YYQCNvzj17F726QvKoIiuRGeUBl_xAKj62Zvc9xkZb4Because the value of the uid claim in the JWT is 222, we expect NGINX Plus to display the contents of the restricted page, http://secure.example.com.
Now we test to verify that when the url claim in the JWT is not 222, NGINX Plus does not display the contents of the restricted page, but instead presents the index.html page of the local server, in this case http://example.com/index.html.
We start by generating another JWT at jwt.io with a uid claim other than 222; for the sake of example, we make it 111. Here’s the request URL with that JWT:
http://example.com/index.html?myjwt=eyJhbGciOiJIUzI1NiIsInR5cCI6IkpXVCJ9.eyJleHAiO
jE1NDUwOTEyMDAsIm5hbWUiOiJDcmVhdGUgTmV3IFVzZXIiLCJzdWIiOiJjdXNlciIsImduYW
1lIjoid2hlZWwiLCJndWlkIjoiMTAiLCJmdWxsTmFtZSI6IkpvaG4gRG9lIiwidW5hbWUiOiJqZG9
lIiwidWlkIjoiMTExIiwic3VkbyI6dHJ1ZSwiZGVwdCI6IklUIiwidXJsIjoiaHR0cDovL3NlY3VyZS5l
eGFtcGxlLmNvbSJ9.Ch9xqsGzB8fRVX-3CBuCxP1Ia3oGKB1OnO6qwi_oBgg
The curl command is:
# curl -v example.com/index.html?myjwt=eyJhbGciOiJIUzI1NiIsInR5cCI6IkpXVCJ9.eyJleHAiOjE1NDUwOTEyMDAsIm5hbWUiOiJDcmVhdGUgTmV3IFVzZXIiLCJzdWIiOiJjdXNlciIsImduYW1lIjoid2hlZWwiLCJndWlkIjoiMTAiLCJmdWxsTmFtZSI6IkpvaG4gRG9lIiwidW5hbWUiOiJqZG9lIiwidWlkIjoiMTExIiwic3VkbyI6dHJ1ZSwiZGVwdCI6IklUIiwidXJsIjoiaHR0cDovL3NlY3VyZS5leGFtcGxlLmNvbSJ9.Ch9xqsGzB8fRVX-3CBuCxP1Ia3oGKB1OnO6qwi_oBggIn this case, we expect NGINX Plus to serve http://example.com/index.html.
In both test conditions, you can use a header‑inspection tool (such as curl or the developer tools provided with some browsers) to verify that the new headers, X-jwt-claim-uid and X-jwt-status, were added to the response.
If you have any issues during testing, check the access and error logs at /var/log/nginx/host.jwt*. The error log in particular reveals problems with verification, accessing your verification file, and so on.
Passing the JWT in a Cookie
In our basic example, NGINX Plus extracts the JWT from the myjwt argument on the request URL. NGINX Plus also supports passing the JWT in a cookie (for details, see the NGINX JWT reference documentation). In jwt-test.conf, change the auth_jwt directive so that the first element in the token parameter is $cookie instead of $arg:
auth_jwt "JWT Test Realm" token=$cookie_myjwt;To provide the JWT in a cookie called myjwt, the appropriate curl command is:
# curl -v --cookie myjwt=JWT-text example.com/index.htmlTry out content‑based routing with JWTs for yourself: start your free 30-day trial of NGINX today or contact us to discuss your uses cases.
About the Author

Related Blog Posts

Automating Certificate Management in a Kubernetes Environment
Simplify cert management by providing unique, automatically renewed and updated certificates to your endpoints.

Secure Your API Gateway with NGINX App Protect WAF
As monoliths move to microservices, applications are developed faster than ever. Speed is necessary to stay competitive and APIs sit at the front of these rapid modernization efforts. But the popularity of APIs for application modernization has significant implications for app security.
How Do I Choose? API Gateway vs. Ingress Controller vs. Service Mesh
When you need an API gateway in Kubernetes, how do you choose among API gateway vs. Ingress controller vs. service mesh? We guide you through the decision, with sample scenarios for north-south and east-west API traffic, plus use cases where an API gateway is the right tool.
Deploying NGINX as an API Gateway, Part 2: Protecting Backend Services
In the second post in our API gateway series, Liam shows you how to batten down the hatches on your API services. You can use rate limiting, access restrictions, request size limits, and request body validation to frustrate illegitimate or overly burdensome requests.
New Joomla Exploit CVE-2015-8562
Read about the new zero day exploit in Joomla and see the NGINX configuration for how to apply a fix in NGINX or NGINX Plus.
Why Do I See “Welcome to nginx!” on My Favorite Website?
The ‘Welcome to NGINX!’ page is presented when NGINX web server software is installed on a computer but has not finished configuring